SCID: IP
over IP tunnel
Yu Cai
1) IP tunnel Introduction
IP tunneling (IP
encapsulation) is a technique to encapsulate IP datagram within IP datagrams,
which allows datagrams destined for one IP address to be wrapped and redirected
to another IP address. IP encapsulation is now commonly used in Extranet,
Mobile-IP, IP-Multicast, tunneled host or network.
There are 3 kinds of tunnels: IP over IP tunneling, GRE tunneling and tunnels
that live outside the kernel. In
this project, we are using IP over IP tunneling, also noted as IPIP tunnel, or
IP in IP tunnel. Examples of tunnels include PPTP, IPSec, L2TP etc.
Tunneling increases overhead, because it needs an extra set of IP headers.
Typically this is 20 bytes per packet, so if the normal packet size (MTU) on a
network is 1500 bytes, a packet that is sent through a tunnel can only be 1480
bytes big.
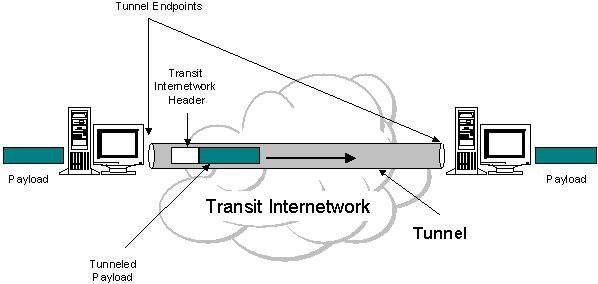
Here is an IP tunneling diagram:
2) Steps
to setup IP over IP tunnel (IPIP tunnel) on Redhat Linux
2.1) Install IP tunnel package.
Most of the time, your redhat linux should already have ip tunnel package
installed by default. You can check it by running "ip tunnel add tunl1 mode ipip remote
192.168.1.1". If you can successfully add a new ip tunnel, then you are ok.
But If not, then you need to recompile linux kernel to enable IPIP tunnel.
see this howto for kernel recompile from redhat linux.
Kernel Compile Options:
	Networking options  --->
	    [*] TCP/IP networking
	    [*] IP: forwarding/gateway
	    ....
	    <*> IP: tunneling
|
2.2) Setup
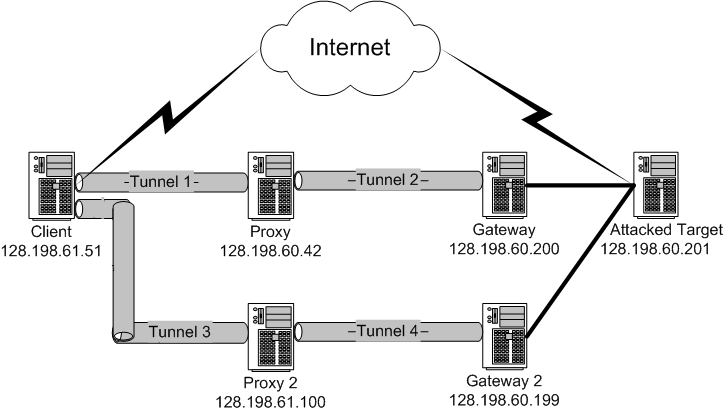
the IP tunnel testbed and config route tables/firewall rules on each machine
Below is the test bed view graph (all machines are running redhat 9)
In most IP
tunnel scenarios, people use public IP address and private IP address to config
the tunnel. It makes sense because connecting two private lan through IP tunnel
is one of the major use of IP tunneling. But in our project, we don't
want any private IP address, so we config the IPIP tunnel with only public IP.
Below are
scripts on each machine.
a) Script on
client to setup tunnel 1
#!/bin/sh
#------------------------------------------------
# IPIP tunnel config scipt on client side
#
# By Yu Cai (ycai@uccs.edu) at UCCS, June 2003
#------------------------------------------------
#define var
client_ip=128.198.61.51
client_gw=128.198.61.1
proxy_ip=128.198.60.42
proxy_gw=128.198.60.1
gw_ip=128.198.60.200
gw_gw=128.198.60.129
target_ip=128.198.60.201
tunl=tunl1
#config tunnel between client and proxy
ip tunnel add $tunl mode ipip remote $proxy_ip dev eth0
ifconfig $tunl $client_ip
ip link set $tunl up
ip route add $proxy_ip via $client_gw dev $tunl onlink
#route traffic between client and gateway through tunnel
ip route add $gw_ip via $client_gw dev $tunl onlink
#route traffic between client and target through tunnel
ip route add $target_ip via $client_gw dev $tunl onlink
|
Script on client to setup
tunnel 3
#!/bin/sh
#------------------------------------------------
# IPIP tunnel config scipt on client side
#
# By Yu Cai (ycai@uccs.edu) at UCCS, June 2003
#------------------------------------------------
#define var
client_ip=128.198.61.51
client_gw=128.198.61.1
proxy_ip=128.198.61.100
proxy_gw=128.198.61.1
gw_ip=128.198.60.199
gw_gw=128.198.60.129
tunl=tunl3
#config tunnel between client and proxy
ip tunnel add $tunl mode ipip remote $proxy_ip dev eth0
ifconfig $tunl $client_ip
ip link set $tunl up
ip route add $proxy_ip via $client_gw dev $tunl onlink
#route traffic between client and gateway through tunnel
ip route add $gw_ip via $client_gw dev $tunl onlink |
b) Script on
proxy (script on proxy2 is similiar)
#!/bin/sh
#------------------------------------------------
# IPIP tunnel config scipt on proxy side
#
# By Yu Cai (ycai@uccs.edu) at UCCS, June 2003
#------------------------------------------------
iptables -F
iptables -P INPUT ACCEPT
iptables -P FORWARD ACCEPT
#enable ip forwarding
echo "1" > /proc/sys/net/ipv4/ip_forward
#define var
client_ip=128.198.61.51
client_gw=128.198.61.1
proxy_ip=128.198.60.42
proxy_gw=128.198.60.1
gw_ip=128.198.60.200
gw_gw=128.198.60.129
target_ip=128.198.60.201
#config tunnel between proxy and client
tunl=tunl1
ip tunnel add $tunl mode ipip remote $client_ip dev eth0
ifconfig $tunl $proxy_ip
ip link set $tunl up
ip route add $client_ip via $proxy_gw dev $tunl onlink
#config tunnel between proxy and gateway
tunl=tunl2
ip tunnel add $tunl mode ipip remote $gw_ip dev eth0
ifconfig $tunl $proxy_ip
ip link set $tunl up
ip route add $gw_ip via $proxy_gw dev $tunl onlink
#route between proxy and target through tunnel
ip route add $target_ip via $proxy_gw dev $tunl onlink |
c) Script on
gateway (script on gateway2 is similiar)
#!/bin/sh
#------------------------------------------------
# IPIP tunnel config scipt on gateway side
#
# By Yu Cai (ycai@uccs.edu) at UCCS, June 2003
#------------------------------------------------
iptables -F
iptables -P INPUT ACCEPT
iptables -P FORWARD ACCEPT
echo "1">/proc/sys/net/ipv4/ip_forward
#define var
client_ip=128.198.61.51
client_gw=128.198.61.1
proxy_ip=128.198.60.42
proxy_gw=128.198.60.1
gw_ip=128.198.60.200
gw_gw=128.198.60.129
tunl=tunl2
#config tunnel between gateway and proxy
ip tunnel add $tunl mode ipip remote $proxy_ip dev eth0
ifconfig $tunl $gw_ip
ip link set $tunl up
ip route add $proxy_ip via $gw_gw dev $tunl onlink
#route traffic between client and gateway through tunnel
ip route add $client_ip via $gw_gw dev $tunl onlink |
d) Script on target
#!/bin/sh
#-----------------------------------------------
#IPIP tunnel config script on target side
#
#By Yu Cai(ycai@uccs.edu) at UCCS, June 2003
#-----------------------------------------------
#define var
client_ip=128.198.61.51
gw_ip=128.198.60.200
#route between client and target through gateway
ip route add $client_ip via $gw_ip dev eth0 onlink |
2.3) Verify your config and make sure the IPIP
tunnel set up successfully.
After the
configuration, you should be able to see the ip tunnel device.
[root@client root]# ifconfig
eth0 Link encap:Ethernet HWaddr 00:0C:29:47:59:30
inet addr:128.198.61.51 Bcast:128.198.61.63 Mask:255.255.255.192
UP BROADCAST RUNNING MULTICAST MTU:1500 Metric:1
RX packets:116492 errors:0 dropped:0 overruns:0 frame:0
TX packets:543 errors:0 dropped:0 overruns:0 carrier:0
collisions:0 txqueuelen:100
RX bytes:8552726 (8.1 Mb) TX bytes:48894 (47.7 Kb)
Interrupt:18 Base address:0x10a0
tunl1 Link encap:IPIP
Tunnel HWaddr
inet addr:128.198.61.51 P-t-P:128.198.61.51 Mask:255.255.255.255
UP POINTOPOINT RUNNING NOARP MTU:1480 Metric:1
RX packets:0 errors:0 dropped:0 overruns:0 frame:0
TX packets:0 errors:0 dropped:0 overruns:0 carrier:0
collisions:0 txqueuelen:0
RX bytes:0 (0.0 b) TX bytes:0 (0.0 b)
[root@client root]# ip link show
1: eth0: <BROADCAST,MULTICAST,UP> mtu 1500 qdisc pfifo_fast qlen 100
link/ether 00:0c:29:47:59:30 brd ff:ff:ff:ff:ff:ff
2: tunl0@NONE: <NOARP> mtu 1480 qdisc noop link/ipip 0.0.0.0 brd 0.0.0.0
3: tunl1@eth0: <POINTOPOINT,NOARP,UP> mtu
1480 qdisc
noqueue link/ipip
0.0.0.0 peer 128.198.60.42
[root@client root]# route -n
Kernel IP routing table
Destination Gateway Genmask Flags Metric Ref Use Iface
128.198.60.42 128.198.61.1
255.255.255.255 UGH 0 0 0 tunl1
128.198.61.0 0.0.0.0 255.255.255.192 U 0 0 0 eth0
0.0.0.0 128.198.61.1 0.0.0.0 UG 0 0 0 eth0 |
Also, you should be able to ping gateway from client, and vice verse,
by passing through IPIP tunnel.
How to you know you are going through IPIP
tunnel, not a regular internet route?
Run "netstat -i" on each machine several times during the ping session, you
will
see IP packages passing through tunnel interfaces.
[root@proxy root]# netstat -i
Kernel Interface table
Iface MTU Met RX-OK RX-ERR RX-DRP RX-OVR TX-OK TX-ERR TX-DRP TX-OVR Flg
eth0 1500 0 76651 0 0 0 863 0 0 0 BMRU
tunl1 1480 0 0 0 0 0 0 0 0 0
OPRU
[root@proxy root]# netstat -i
Kernel Interface table
Iface MTU Met RX-OK RX-ERR RX-DRP RX-OVR TX-OK TX-ERR TX-DRP TX-OVR Flg
eth0 1500 0 76676 0 0 0 878 0 0 0 BMRU
tunl1 1480 0 52 0 0 0 52 0 0
0 OPRU
[root@proxy root]# netstat -i
Kernel Interface table
Iface MTU Met RX-OK RX-ERR RX-DRP RX-OVR TX-OK TX-ERR TX-DRP TX-OVR Flg
eth0 1500 0 76676 0 0 0 878 0 0 0 BMRU
tunl1 1480 0 104 0 0 0 104 0
0 0 OPRU |
For some reason, when you use tethereal to
monitor the traffic, you won't see any thing!?
To disable the tunnel interface, run "ifconfig tunl1 down".
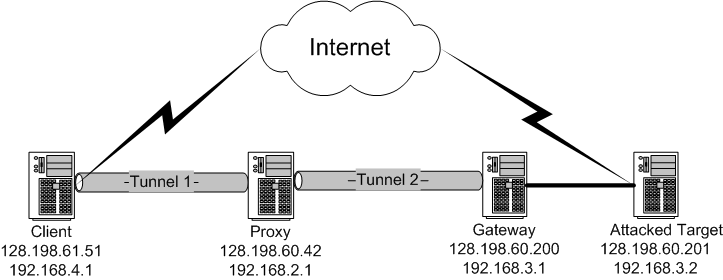
2.4) For those who want to setup IP tunnel with private
IP and public IP
In most IP
tunnel scenarios, people use public IP address and private IP address to config
the tunnel. It makes sense because connecting two private lan through IP tunnel
is one of the major use of IP tunneling.
Below is the testbed view graph for IP tunnel with private IP and public IP.
Below is the config script.
#-----------------------------------------------------
# IPIP tunnel config scipt on client side
#-----------------------------------------------------
#config tunl1 connecting client and proxy
ip tunnel add tunl1 mode ipip remote 128.198.60.42 dev eth0
ifconfig tunl1 192.168.4.1
ip link set tunl1 up
#route between client and proxy
ip route add 192.168.2.1 via 128.198.61.1 dev tunl1 onlink
ip route add 192.168.3.1 via 128.198.61.1 dev tunl1 onlink
|
#-----------------------------------------------------
# IPIP tunnel config scipt on proxy side
#-----------------------------------------------------
iptables -F
iptables -P INPUT ACCEPT
iptables -P FORWARD ACCEPT
echo "1" > /proc/sys/net/ipv4/ip_forward
#config tunl1 between proxy and client
ip tunnel add tunl1 mode ipip remote 128.198.61.51
ifconfig tunl1 192.168.2.1
ip link set tunl1 up
ip route add 192.168.4.1 via 128.198.60.1 dev tunl1 onlink
#config tunl2 between proxy and gateway
ip tunnel add tunl2 mode ipip remote 128.198.60.200
ifconfig tunl2 192.168.2.1
ip link set tunl2 up
ip route add 192.168.3.1 via 128.198.60.1 dev tunl2 onlink
|
#-----------------------------------------------------
# IPIP tunnel config scipt on gateway side
#-----------------------------------------------------
#config tunl2 between proxy and gateway
ip tunnel add tunl2 mode ipip remote 128.198.60.42
ifconfig tunl2 192.168.3.1
ip link set tunl2 up
ip route add 192.168.2.1 via 128.198.60.129 dev tunl2 onlink
ip route add 192.168.4.1 via 128.198.60.129 dev tunl2 onlink
|
2.5) For those who want to setup IP tunnel on
Windows.
If you want to setup IP tunnel on windows,
make sure you have windows 2000 server or advance server.
Since IP tunnel requires advanced features of routing and remote access, windows
Me, window XP, window 2000 professional don't support IPIP tunnel. (This is kind
of weird, because windows XP support IPsec tunnel, but not IPIP tunnel.)
Also, IP tunnel on Windows didn't support public
IP only configuration, you have to config the machines with private IP as well
as public IP.
You can set up IP tunnel between two windows
machines, or a windows/ a linux.
Below is the test bed view graph: (Client is
windows 2000 advance server, proxy/gateway/target are redhat 9)
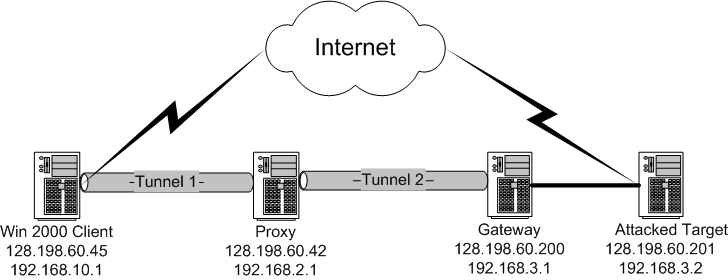
Here is a step by step guide on how to configure IP tunnel
between a windows 2000 advance server and a redhat 9 machine
[client (win 2000, IP 128.198.60.45 and 192.168.10.1) and proxy (redhat 9, IP
128.198.61.51 and 192.168.4.1) in above graph].
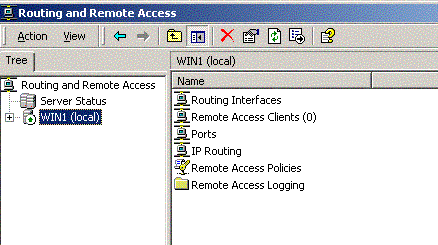
| 1) On windows 2000 machine (client), see if Routing and
Remote Access Service is running |
Windows Control Pane or
Administrative Tools ==>Service ==> Routing and Remote Access Running.
If it is not running,
Windows Control Pane or Administrative Tools ==>Routing and Remote Access
==>In the console tree, click the server you use
==> right click "Config Routing and Remote Access"
==> select "Manually Configure server"
==> follow the instruction.
|
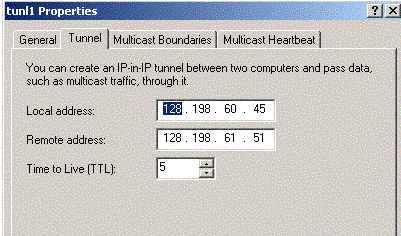
| 2) Create Tunnel Interface |
Windows Control Pane or Administrative Tools ==>Routing and Remote Access
==> In the console tree, click the server you use & select Routing Interface
==> R-click Routing Interface & choose 'New IP tunnel'
==> In interface name, type a name for the tunnel, and click OK

Now we have a new IP tunnel interface, below is how we use it.
==> In the console tree, click IP Routing, r-click General, and then click New Interface
==> In Interfaces, click the IP-in-IP tunnel you just created
==> On the Tunnel tab
     - Local address : IP address of the tunnel start point (your public IP)
     - Remote address: IP address of the tunnel endpoint (remote public IP)
|
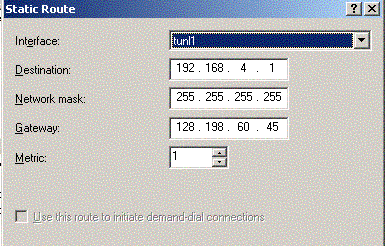
3) Add
new Static Route
|
In Administrative Tools
==> Routing & Remote Access
==> Choose the server you want
==>IP Routing ==> R-click 'Static Route'
==> Select 'New Static Route'
==> Enter the parameter below:
- Interface : the IP tunnel which you just created.
- Destination : IP address of the tunnel endpoint (remote
private IP)
- Net
Mask : 255.255.255.255
- Gateway: IP address of the tunnel start point (your
public IP)
|
| 4) Above is the manual configuration on windows 2000. We can
use netsh script to setup the ip tunnel on windows. |
#-------------------------------------------------------------------------
# IPIP tunnel config batch script on windows 2000 advance server
#
# By Yu Cai (ycai@uccs.edu) at UCCS, June 2003
#-------------------------------------------------------------------------
netsh interface add interface tunl1 tunnel
netsh routing ip set ipiptunnel tunl1 128.198.60.45 128.198.61.50 5
netsh routing ip add rtmroute dest=192.168.4.1 mask=255.255.255.255 nameorindex=tunl1
|
5) Now the config on windows 2000 is finished.
Let's config on the redhat 9 machine (Proxy). Here is the script. |
#!/bin/sh
#------------------------------------------------
# IPIP tunnel config scipt on proxy side
# connecting a redhat linux 9 and a windows 2000 advance server
#
# By Yu Cai (ycai@uccs.edu) at UCCS, June 2003
#------------------------------------------------
#config tunl1 between win2000 and redhat9
ip tunnel add tunl1 mode ipip remote 128.198.60.45 dev eth0
ifconfig tunl1 192.168.4.1
ip link set tunl1 up
ip route add 192.168.10.1 via 128.198.61.1 dev tunl1 onlink
|
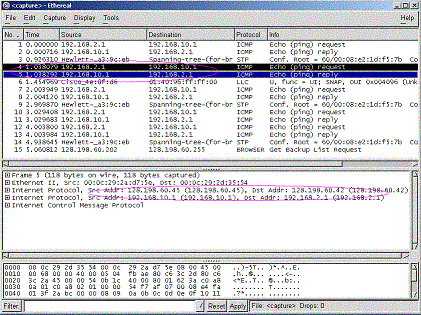
| 6) See if the IP tunnel is really setup. |
Ping 192.168.10.1 from 192.168.4.1 and vice
verse.
Run ethereal on one side, you should catch some TCP packages like below.
Notice that the packages have two IP header with different IP address.
 |
3) Performance
Benchmark
Test below is based on configuration of
Section 2.2: linux machines with public IP only.
3.1) Testbed machine configuration.
| Machine |
Settings |
| Client |
Virtual
Machine on ardor.uccs.edu, 256M RAM, 2 G hard disk |
| Proxy |
same |
| Gateway |
same |
| Target |
same |
| Proxy 2 |
Virtual
Machine on athena.uccs.edu, 256M RAM, 2 G hard disk |
| Gateway 2 |
Virtual
Machine on wait.uccs.edu, 256M RAM, 2 G hard disk |
3.2) Response Time benchmark using Ping
I ping gateway from client. Below is the testing result (result is the average of 10 tests).
| With direct route |
With indirect
route through IPIP tunnel |
0.54 ms
(only 1 hop) |
1.18 ms
(2 hops, you can't see them with traceroute) |
3.3) Throughput benchmark using FTP
I installed VSFTP server
on gateway machine. On client machine, retrieve a 100MB file from gateway.
Below is the testing result (result is the average of 10 tests).
| With direct route |
With indirect
route through IPIP tunnel |
| 12.8 second |
24.5 second |
When the main gateway got
attacked, the performance on the direct route will go from 12 seconds to days or
infinity. The overhead occurs in the indirect route include more hop, more
protocol processing (it goes through proxy server; and IP over IP overhead
related to fragmentation; can be reduced if the client can set MSB to max - 20
(additional IP header)).
4) Related Questions
1) How many IP tunnels are allowed in redhat
linux and windows 2000 server?
It seems unlimited or only limited by
system resources. I wrote a script to add more than 100 tunnels, and it seems to
work fine (on linux and on windows).
Not sure about the effect of frequent and large amount of connect and disconnect
of tunnel.
Not sure about the effect of heavy traffic passing through tunnel.
5) Related Resources
1)
Compile linux kernel.
2)
IP tunnel howto from redhat
3) IProute2
4)
IPIP howto from redhat
5)
IPtables command reference