Secure access to a web server can be enhanced by requiring a client to present its digital certificate.
A certificate of a subject (client/servers) is a document that contains the information about the subject, the public key of the sender, valid period of the certificate, the issuer (Certificate Authority (CA) that signed the certificate), and the certificate signature. Note that the subject field and public key information are sent by the requester. The other fields are filled in by the CA. The certificates are posted on CA or sender sites.
In Public Key Infrastructure (PKI), there are organizations called Certificate Authorities (CA), which "sign" or certify the certificate requests sent in by others and return the signed certificate (digital certificates). CAs are also responsible for revoking the certificates and maintaining a certificate revoke list (CRL).
The Public Key Infrastructure utilizes Public Key cryptography which was first proposed by Diffie and Hellman in 1976. Public Key cryptography uses a pair of keys; one public key to be distributed to other communicating parties, and one private key that must be protected and hidden. Data that is encrypted by one key can only be decrypted by the other key of the pair.
In order to authenticate oneself, one can encrypt a known text with ones private key and send the cipher (encrypted text) to others. The receiver can then use the public key (downloaded from the CA or senders website) of the sender to decrypt the encrypted text.
To encrypt the text and only allow a receiver to see it, the sender encrypts the text with the receivers public key and sends the cipher text. Only the receiver with the corresponding private key can decipher the cipher text.
For more information about how digital certificates can be used to authenticate users/servers, see Apache document on SSL/TLS Strong Encryption at http://cs.uccs.edu/manual/ssl/ssl_intro.html.
In order to sign a certificate, the CA takes all the fields of the certificate, except the last field , and generates the message digest (hash). The CA then encrypts (signs) the message digest using the CA's private key. The resulting encrypted/signed message digest is called the signature. The signature fills the last field of the certificate.
A variety of methods are available for generating the hash, for example MD5, SHA1, SHA-256 etc. However, MD5 is vulnerable and Federal Agencies are urging the phasing out of SHA1. Therefore, we should refrain from using MD5 and use SHA-256 if possible, if not we should at least use SHA1.
The various fields of an X.509 certificate are shown at http://cs.uccs.edu/~cs591/crypto/basicCrypto.ppt#57
Certificate:
Data:
Version: 3 (0x2)
Serial Number: 1 (0x1)
Signature Algorithm: sha1WithRSAEncryption
Issuer: C=US, ST=Colorado, O=UCCS, OU=Computer Science, CN=CAfc6/emailAddress=ca@fc6.csnet.uccs.edu
Validity
Not Before: Dec 22 18:52:38 2006 GMT
Not After : Dec 22 18:52:38 2007 GMT
Subject: C=US, ST=Colorado, L=Colorado Springs, O=UCCS, OU=Computer Science, CN=fc6.csnet.uccs.edu/emailAddress=webmaster@fc6.csnet.uccs.edu
Subject Public Key Info:
Public Key Algorithm: rsaEncryption
RSA Public Key: (1024 bit)
Modulus (1024 bit):
00:cc:91:db:ea:95:c6:d3:03:75:cd:74:b5:58:28:
b7:df:e5:33:4b:82:53:90:b0:98:5f:14:0b:d1:1a:
44:e4:41:0b:e8:59:f6:f9:d1:26:6a:d9:25:a5:ac:
8e:9d:f0:cd:65:f2:3a:13:b7:37:e2:82:3f:02:e4:
fd:f6:0b:eb:4d:27:97:2b:ab:74:07:8d:fa:0c:4b:
27:ea:c8:78:f6:1e:60:b9:fc:5f:30:0f:8f:02:4b:
d4:d1:b4:bc:a1:bb:d6:e9:dd:78:2e:76:28:21:b5:
5b:76:88:f7:cd:d3:40:26:07:33:2e:95:71:09:e1:
b4:5f:b2:95:99:fd:30:17:49
Exponent: 65537 (0x10001)
X509v3 extensions:
X509v3 Basic Constraints:
CA:FALSE
Netscape Comment:
OpenSSL Generated Certificate
X509v3 Subject Key Identifier:
CA:D9:9B:01:D2:9C:15:39:96:62:53:29:D6:6E:D8:B8:62:9D:A0:BD
X509v3 Authority Key Identifier:
keyid:DB:B6:B7:15:40:C4:7B:14:AE:F6:CB:A9:DF:44:C3:1E:39:AE:E0:DD

Signature Algorithm: sha1WithRSAEncryption
69:a4:15:98:77:7e:fb:38:88:c3:a0:2e:d8:2b:24:51:50:2c:
cd:dc:a7:56:e0:f5:f3:01:73:47:b2:67:69:4b:94:28:e9:86:
51:fd:e0:2f:a0:30:8a:0d:0c:10:3d:5c:d5:4a:53:df:ea:0c:
38:49:61:1b:92:61:fe:7f:96:bb:65:f4:f9:14:40:52:7d:aa:
8c:0d:07:e1:06:aa:fb:bf:72:6f:7c:d1:68:6e:78:d6:30:7c:
6b:f0:b9:ce:57:5b:f9:d2:cc:df:2c:42:f3:e0:42:cf:0b:5e:
57:ff:72:ac:4a:2b:b9:ac:df:b7:23:80:ea:e4:37:01:b3:13:
9f:73
Here is a bundle of X.509 certificates of public Certificate Authorities used in Fedora Core 4. It is located in /etc/pki/tls/cert.pem. It was generated from the Mozilla root CA list. "The binary format of a certificate is defined using the ASN.1 notation [ X208] [PKCS]. This notation defines how to specify the contents, and encoding rules define how this information is translated into binary form. The binary encoding of the certificate is defined using Distinguished Encoding Rules (DER), which are based on the more general Basic Encoding Rules (BER). For those transmissions which cannot handle binary, the binary form may be translated into an ASCII form by using Base64 encoding [MIME]. This encoded version is called PEM encoded (the name comes from "Privacy Enhanced Mail"), when placed between begin and end delimiter lines" (cited in http://cs.uccs.edu/manual/ssl/ssl_intro.html) as follows:
-----BEGIN CERTIFICATE-----
MIID5TCCA06gAwIBAgIBATANBgkqhkiG9w0BAQQFADCBnDELMAkGA1UEBhMCVVMx
ETAPBgNVBAgTCENvbG9yYWRvMRkwFwYDVQQHExBDb2xvcmFkbyBTcHJpbmdzMQ0w
CwYDVQQKEwRVQ0NTMRkwFwYDVQQLExBDb21wdXRlciBTY2llbmNlMQ4wDAYDVQQD
EwVDQWZjMzElMCMGCSqGSIb3DQEJARYWY2FAZmMzYy5jc25ldC51Y2NzLmVkdTAe
Fw0wNTAyMTUyMDE0NTVaFw0wNjAyMTUyMDE0NTVaMIGnMQswCQYDVQQGEwJVUzER
MA8GA1UECBMIQ29sb3JhZG8xGTAXBgNVBAcTEENvbG9yYWRvIFNwcmluZ3MxDTAL
BgNVBAoTBFVDQ1MxGTAXBgNVBAsTEENvbXB1dGVyIFNjaWVuY2UxEjAQBgNVBAMT
CXNlcnZlcmZjMzEsMCoGCSqGSIb3DQEJARYdd2VibWFzdGVyQGZjM2MuY3NuZXQu
dWNjcy5lZHUwgZ8wDQYJKoZIhvcNAQEBBQADgY0AMIGJAoGBAKOKS2ybJQvfVSZ+
S107zZ2g/XMKewCB1MJ+NAEIouGKnuzSXp1cYSkF74bhHebRnieFKuh8E46Wzb4D
0NAjKSjPl+o4t0Vaio7G/A/NRajOguUnktEcxnpRMPRKWisdYPjIIfIODSCdvm2+
2x+AZqUz5wq6rHjIpVvpB/uDwFkRAgMBAAGjggEoMIIBJDAJBgNVHRMEAjAAMCwG
CWCGSAGG+EIBDQQfFh1PcGVuU1NMIEdlbmVyYXRlZCBDZXJ0aWZpY2F0ZTAdBgNV
HQ4EFgQU3PyFt38BM+uBeB0pp7yod48vrT4wgckGA1UdIwSBwTCBvoAUFc/qWQ2+
XlU+YbK0qSsoGNufow2hgaKkgZ8wgZwxCzAJBgNVBAYTAlVTMREwDwYDVQQIEwhD
b2xvcmFkbzEZMBcGA1UEBxMQQ29sb3JhZG8gU3ByaW5nczENMAsGA1UEChMEVUND
UzEZMBcGA1UECxMQQ29tcHV0ZXIgU2NpZW5jZTEOMAwGA1UEAxMFQ0FmYzMxJTAj
BgkqhkiG9w0BCQEWFmNhQGZjM2MuY3NuZXQudWNjcy5lZHWCAQAwDQYJKoZIhvcN
AQEEBQADgYEAVf+84FCS52xLo/QPZtLyiMsT4yA5Ik0hZtgncH84ymhOJXIhTx0G
nTr+NOGucLRyf9X633oTr+eOvJO9CROEBgPCgrOL4A0wJh1tM1xSm3y4GSBqEpJM
LIZE50TRjk9CgSWrGwuKFdWMXKXitVLqQhG8vAA1JvEj66mJTUP0Ino=
-----END CERTIFICATE-----
The certificates and keys generated by Openssl are saved, by default, in pem file format. Utilities are available to convert then to different formats, such as pkcs12 format which can be imported to Netscape/Firefox browsers. To learn how certificates and SSL are used to enhance secure web access, see the brief description in http://httpd.apache.org/docs-2.0/ssl/ssl_faq.html#aboutcerts
The current apache distribution supports secure web server using mod_ssl module. The mod_ssl v1 package was initially created in April 1998 by Ralf S. Engelschall via porting Ben Laurie's Apache-SSL 1.17 source patches for Apache 1.2.6 to Apache 1.3b6. The configuration file ssl.conf is /etc/httpd/conf.d/ssl.conf (See Apache SSL/TLS Encryption for more details. http://httpd.apache.org/docs-2.0/ssl/) The SSLCipherSuite specifies the order of ciphers the client is permitted to negotiate: http://httpd.apache.org/docs-2.0/mod/mod_ssl.html#sslciphersuite The FC6 apache distribution uses
SSLCipherSuite ALL:!ADH:!EXPORT56:RC4+RSA:+HIGH:+MEDIUM:+LOW:+SSLv2: +EXP
You can see the resulting cipher list by executing
"openssl ciphers -v 'ALL:!ADH:!EXPORT56:RC4+RSA: +HIGH:+MEDIUM:+LOW:+SSLv2:+EXP'
Testing https: $ openssl s_client -connect localhost:443 -state -debug GET / HTTP/1.0
There is command line test tool called curl, http://curl.haxx.se/download.html Curl is a command line tool for transferring files with URL syntax, supporting FTP, FTPS, HTTP, HTTPS, GOPHER, TELNET, DICT, FILE and LDAP. Curl supports HTTPS certificates, HTTP POST, HTTP PUT, FTP uploading, kerberos, HTTP form based upload, proxies, cookies, user+password authentication, file transfer resume, http proxy tunneling and a busload of other useful tricks. http://curl.haxx.se/docs/sslcerts.html. Add the CA cert for your server to the existing default CA cert bundle. The default path of the CA bundle installed with the curl package is: /usr/local/share/curl/curl-ca-bundle.crt, which can be changed by running configure with the --with-ca-bundle option pointing out the path of your choice. Using OpenSSL to create new CA (private key and certificate), to create new server private key and certificate request, and to have the new CA sign the server certificate. The OpenSSL Project is a collaborative effort to develop a robust, commercial-grade, full featured, and Open Source toolkit implementing the Secure Socket Layer (SSL v2/v3) and Transport Layer Security (TLS v1) protocols as well as a full-strength general pupose cryptography library.
Here, we will explore how to configure apache web server to accept SSL connection and to allow
access to certain directories by requiring the client to present their certificate.
In the following, we will use the FC6 virtual machine to illustrate the process. We will use the
Openssl software package to:
On FC6 and FC4 there is a CA shell script for creating self-signed CA, server/client requests,
and for signing the certificate request. The CA shell can be found in /etc/pki/tls. In FC3, the
CA shell can be found in /usr/shar/ssl/misc.
CA -newca will set up the right information for the CA.
CA -newreq will generate a certificate request.
CA -sign will sign the generated request and output.
The CA script utilizes openssl commands. A brief description on the related commands which are used can be found at http://www.openssl.org/docs/HOWTO/certificates.txt The openssl utility reads the openssl.cnf configuration file to find out the location of the default settings for the subject fields and default CA private key and certificate. For both FC6 and FC4, openssl.cnf is saved in /etc/pki/tls/. For FC3, openssl.cnf is saved in /usr/share/ssl/.
Edit the distinguished name section of openssl.cnf by replacing the attributes in red:
[ CA_default ]

default_md = sha1
[ req_distinguished_name ]
countryName = Country Name (2 letter code)
countryName_default = US
countryName_min = 2
countryName_max = 2
stateOrProvinceName = State or Province Name (full name)
stateOrProvinceName_default = Colorado
localityName = Locality Name (eg, city)
localityName_default = Colorado Springs
0.organizationName = Organization Name (eg, company)
0.organizationName_default = UCCS
# we can do this but it is not needed normally :-)
#1.organizationName = Second Organization Name (eg, company)
#1.organizationName_default = World Wide Web Pty Ltd
organizationalUnitName = Organizational Unit Name (eg, section)
organizationalUnitName_default = Computer Science
# make sure you remove the # before organizationalUnitName_default in the above lineSave the changes to this file.
Here are the detailed steps for creating a new CA. Use the same password when asked for the pass phrase (password). This makes it easier to remember. It is suggested that you use the same password that you use to login to the FC6 virtual machine. Enter CAfc6 for the common name and ca@fc6.csnet.uccs.edu for the Email address.
[root@localhost tls]# rm -rf ./../CA
This removes the old certificates/keys/crl in /etc/CA directory and allows us to create a new CA directory. (On FC3, the above directory is in /usr/share/ssl/demoCA.)
   [root@localhost tls]# misc/CA -newca
   CA certificate filename (or enter to create)
   Making CA certificate ...
   Generating a 1024 bit RSA private key
   .............++++++
   .......................++++++
   writing new private key to '../../CA/private/./cakey.pem'
   Enter PEM pass phrase:	XXXXXXXXX
   Verifying - Enter PEM pass phrase:	XXXXXXXXX
   -----
  You are about to be asked to enter information that will be incorporated
  into your certificate request.
  What you are about to enter is what is called a Distinguished Name or a DN.
There are quite a few fields but you can leave some blank
For some fields there will be a default value,
If you enter '.', the field will be left blank.
-----
Country Name (2 letter code) [US]:   # hit enter for the default choice we specified in openssl.cnf
State or Province Name (full name) [Colorado]:
Locality Name (eg, city) [Colorado Springs]:
Organization Name (eg, company) [UCCS]:
Organizational Unit Name (eg, section) [Computer Science]:
Common Name (eg, your name or your server's hostname) []:CAfc6
Email Address []:ca@fc6.csnet.uccs.edu
We use the "CA -newreq" command to create a server certificate request. Enter fc6.csnet.uccs.edu (the domain name used by the web server) for the common name and webmaster@fc6.csnet.uccs.edu for the email address. If you enter a different common name such as serverfc6, the browser will prompt "You have attempted to establish a connection with fc6.csnet.uccs.edu". However, the security certificate presented belongs to "serverfc6". It is possible, though unlikely that someone may be trying to intercept your communication with this web site. Here are the steps for creating a server certificate request:
[root@localhost tls]# misc/CA -newreq
   Generating a 1024 bit RSA private key
   .....++++++
   .........++++++
   writing new private key to 'newkey.pem'
   Enter PEM pass phrase: XXXXXXXXX
   Verifying - Enter PEM pass phrase: XXXXXXXXX
   -----
   You are about to be asked to enter information that will be incorporated into your certificate
   request.
   What you are about to enter is what is called a Distinguished Name or a DN.
   There are quite a few fields but you can leave some blank
   For some fields there will be a default value,
   If you enter '.', the field will be left blank.
   -----
   Country Name (2 letter code) [US]:
   State or Province Name (full name) [Colorado]:
   Locality Name (eg, city) [Colorado Springs]:
   Organization Name (eg, company) [UCCS]:
   Organizational Unit Name (eg, section) [Computer Science]:
   Common Name (eg, your name or your server's hostname) []:fc6.csnet.uccs.edu
   Email Address []:webmaster@fc6.csnet.uccs.edu
   Please enter the following 'extra' attributes
   to be sent with your certificate request
   A challenge password []:
   An optional company name []:
   Request is in newreq.pem, private key is in newkey.pem
Note: In previous versions of Fedora Core, the server certificate and server private key were located in the same newreq.pem file. In that case, it was necessary to remove the private key from the server certificate request, since we did not want to send the server private key to the CA.
After the server certificate request is granted, it will be sent to the CA site for signing. The server certificate is located in newreq.pem and the server private key is located in newkey.pem.
In reality, we will attach newreq.pem in an email sent to the CA such as Verisign. Here we will use the same machine as the CA. The CA will perform certain "investigations" on the credentials of the server site based on the type/grade of the certificate issued. The signed certificate will then be returned, typically in PEM format, with instructions on how to install it on the web server.
In our case, we are skipping the certificate request/certificate exchange, since we serve both the role of the CA and the web server admin. The certificate request and signed certificate will all be in the same /etc/pki/tls directory.
We use the command "misc/CA -sign". You will first be asked to enter the pass phrase for decrypting the RSA private key of the CA and then be asked to confirm the signing and commit. The CA saves all the signed certificates in /etc/CA/newcerts. The CA certificate is saved as /etc/CA/cacert.pem. The CA private key is save in /etc/CA/private/cakey.pem.
Here are the detailed steps for signing process:
[root@localhost tls]# misc/CA -sign
   Using configuration from /etc/pki/tls/openssl.cnf
   Enter pass phrase for ../../CA/private/cakey.pem: XXXXXXXXX
   Check that the request matches the signature
   Signature ok
   Certificate Details:
   Serial Number: 1 (0x1)
   Validity
   Not Before: Dec 22 18:52:38 2006 GMT
   Not After : Dec 22 18:52:38 2007 GMT
   Subject:
   countryName               = US
   stateOrProvinceName       = Colorado
   localityName              = Colorado Springs
   organizationName          = UCCS
   organizationalUnitName    = Computer Science
   commonName                = fc6.csnet.uccs.edu
   emailAddress              = webmaster@fc6.csnet.uccs.edu
   X509v3 extensions:
   X509v3 Basic Constraints:
   CA:FALSE
   Netscape Comment:
   OpenSSL Generated Certificate
   X509v3 Subject Key Identifier:
   CA:D9:9B:01:D2:9C:15:39:96:62:53:29:D6:6E:D8:B8:62:9D:A0:BD
   X509v3 Authority Key Identifier:
   keyid:DB:B6:B7:15:40:C4:7B:14:AE:F6:CB:A9:DF:44:C3:1E:39:AE:E0:DD


   Certificate is to be certified until Dec 22 18:52:38 2007 GMT (365 days)
   Sign the certificate? [y/n]:y
   1 out of 1 certificate requests certified, commit? [y/n]y
   Write out database with 1 new entries
   Data Base Updated
   Certificate:
   Data:
   Version: 3 (0x2)
   Serial Number: 1 (0x1)
   Signature Algorithm: sha1WithRSAEncryption
   Issuer: C=US, ST=Colorado, O=UCCS, OU=Computer Science, CN=CAfc6/emailAddress=ca@fc6.csnet.uccs.edu
   Validity
   Not Before: Dec 22 18:52:38 2006 GMT
   Not After : Dec 22 18:52:38 2007 GMT
   Subject: C=US, ST=Colorado, L=Colorado Springs, O=UCCS, OU=Computer Science, CN=fc6.csnet.uccs.edu/emailAddress=webmaster@fc6.csnet.uccs.edu
   Subject Public Key Info:
   Public Key Algorithm: rsaEncryption
   RSA Public Key: (1024 bit)
   Modulus (1024 bit):
   00:cc:91:db:ea:95:c6:d3:03:75:cd:74:b5:58:28:
   b7:df:e5:33:4b:82:53:90:b0:98:5f:14:0b:d1:1a:
   44:e4:41:0b:e8:59:f6:f9:d1:26:6a:d9:25:a5:ac:
   8e:9d:f0:cd:65:f2:3a:13:b7:37:e2:82:3f:02:e4:
   fd:f6:0b:eb:4d:27:97:2b:ab:74:07:8d:fa:0c:4b:
   27:ea:c8:78:f6:1e:60:b9:fc:5f:30:0f:8f:02:4b:
   d4:d1:b4:bc:a1:bb:d6:e9:dd:78:2e:76:28:21:b5:
   5b:76:88:f7:cd:d3:40:26:07:33:2e:95:71:09:e1:
   b4:5f:b2:95:99:fd:30:17:49
   Exponent: 65537 (0x10001)
   X509v3 extensions:
   X509v3 Basic Constraints:
   CA:FALSE
   Netscape Comment:
   OpenSSL Generated Certificate
   X509v3 Subject Key Identifier:
   CA:D9:9B:01:D2:9C:15:39:96:62:53:29:D6:6E:D8:B8:62:9D:A0:BD
   X509v3 Authority Key Identifier:
   keyid:DB:B6:B7:15:40:C4:7B:14:AE:F6:CB:A9:DF:44:C3:1E:39:AE:E0:DD
   Signature Algorithm: sha1WithRSAEncryption
   69:a4:15:98:77:7e:fb:38:88:c3:a0:2e:d8:2b:24:51:50:2c:
   cd:dc:a7:56:e0:f5:f3:01:73:47:b2:67:69:4b:94:28:e9:86:
   51:fd:e0:2f:a0:30:8a:0d:0c:10:3d:5c:d5:4a:53:df:ea:0c:
   38:49:61:1b:92:61:fe:7f:96:bb:65:f4:f9:14:40:52:7d:aa:
   8c:0d:07:e1:06:aa:fb:bf:72:6f:7c:d1:68:6e:78:d6:30:7c:
   6b:f0:b9:ce:57:5b:f9:d2:cc:df:2c:42:f3:e0:42:cf:0b:5e:
   57:ff:72:ac:4a:2b:b9:ac:df:b7:23:80:ea:e4:37:01:b3:13:
   9f:73

-----BEGIN CERTIFICATE-----
MIIDIjCCAougAwIBAgIBATANBgkqhkiG9w0BAQUFADCBgDELMAkGA1UEBhMCVVMx
ETAPBgNVBAgTCENvbG9yYWRvMQ0wCwYDVQQKEwRVQ0NTMRkwFwYDVQQLExBDb21w
dXRlciBTY2llbmNlMQ4wDAYDVQQDEwVDQWZjNjEkMCIGCSqGSIb3DQEJARYVY2FA
ZmM2LmNzbmV0LnVjY3MuZWR1MB4XDTA2MTIyMjE4NTIzOFoXDTA3MTIyMjE4NTIz
OFowga8xCzAJBgNVBAYTAlVTMREwDwYDVQQIEwhDb2xvcmFkbzEZMBcGA1UEBxMQ
Q29sb3JhZG8gU3ByaW5nczENMAsGA1UEChMEVUNDUzEZMBcGA1UECxMQQ29tcHV0
ZXIgU2NpZW5jZTEbMBkGA1UEAxMSZmM2LmNzbmV0LnVjY3MuZWR1MSswKQYJKoZI
hvcNAQkBFhx3ZWJtYXN0ZXJAZmM2LmNzbmV0LnVjY3MuZWR1MIGfMA0GCSqGSIb3
DQEBAQUAA4GNADCBiQKBgQDMkdvqlcbTA3XNdLVYKLff5TNLglOQsJhfFAvRGkTk
QQvoWfb50SZq2SWlrI6d8M1l8joTtzfigj8C5P32C+tNJ5crq3QHjfoMSyfqyHj2
HmC5/F8wD48CS9TRtLyhu9bp3XgudightVt2iPfN00AmBzMulXEJ4bRfspWZ/TAX
SQIDAQABo3sweTAJBgNVHRMEAjAAMCwGCWCGSAGG+EIBDQQfFh1PcGVuU1NMIEdl
bmVyYXRlZCBDZXJ0aWZpY2F0ZTAdBgNVHQ4EFgQUytmbAdKcFTmWYlMp1m7YuGKd
oL0wHwYDVR0jBBgwFoAU27a3FUDEexSu9sup30TDHjmu4N0wDQYJKoZIhvcNAQEF
BQADgYEAaaQVmHd++ziIw6Au2CskUVAszdynVuD18wFzR7JnaUuUKOmGUf3gL6Aw
ig0MED1c1UpT3+oMOElhG5Jh/n+Wu2X0+RRAUn2qjA0H4Qaq+79yb3zRaG541jB8
a/C5zldb+dLM3yxC8+BCzwteV/9yrEoruazftyOA6uQ3AbMTn3M=
-----END CERTIFICATE-----

Signed certificate is in newcert.pem
The CA will typically email back the server admin with the signed certificate as an attachment. Here we just rename them. mv newcert.pem fc6ServerCert.pem mv newkey.pem fc6ServerPrivateKey.pem
The configuration file for plain httpd server is in /etc/httpd/conf/httpd.conf file; while that of the secure httpd server is in /etc/httpd/conf.d/ssl.conf. Line 112 of ssl.conf specifies the location of signed server certificate. SSLCertificateFile /etc/pki/tls/certs/localhost.crt Line 119 of ssl.conf specifies the location of server private key. SSLCertificateKeyFile /etc/pki/tls/private/localhost.key The above indicates the FC6 by default accessing the certificate and private key in /etc/pki/tls Note that instead of using .pem as file extension. Apache uses .crt for certificate and .key for key. But they are typically saved with PEM format. You may not find ssl.crt or ssl.key in /etc/httpd/conf directory. cd /etc/httpd/conf cp ssl.crt/server.crt to ssl.crt/server.crt.orig cp ssl.key/server.key to ssl.key/server.key.orig If you do not find ssl.crt or ssl,key directories, create them: mkdir ssl.crt ssl.key Copy the new server certificate and private key. Assume that we are still in /etc/httpd/conf directory
cp /etc/pki/tls/fc6ServerCert.pem ssl.crt/server.crt
cp /etc/pki/tls/fc6ServerPrivateKey.pem ssl.key/server.key
Edit /etc/httpd/conf.d/ssl.conf replace line 112 and 119 with the following:
SSLCertificateFile /etc/httpd/conf/ssl.crt/server.crt
SSLCertificateKeyFile /etc/httpd/conf/ssl.key/server.key
Edit /etc/hosts to replace the line with 127.0.0.1 with the following:
127.0.0.1 fc6.csnet.uccs.edu fc6 localhost.localdomain localhost
This allows us to resolve the fc6.csnet.uccs.edu domain name locally without checking with the DNS system.
Try to run "service httpd restart" We will find that the service will fail to restart. By examining the /etc/httpd/logs/ssl_error_log, we will find that apache complains that it does not read in the pass phrase: [Sun Feb 18 15:28:05 2007][error] Init: Unable to read pass phrase [Hint: key introduced or changed before restart?] The reason is that the fc6ServerPrivateKey.pem is actually protected by the password phrase, it contains the following content:
-----BEGIN RSA PRIVATE KEY-----
Proc-Type: 4,ENCRYPTED
DEK-Info: DES-EDE3-CBC,6BC52F8B3C9C2F3E

dWSWcjNzqmcMXV6rOTzsTFdgdXqEh96FkZlmH7LdMiCvslyCyjcaltPfhYb3wiLX
TOd3kpUn2jvD0vLriapT0ZByMvDJ9dbIie1JMQb8XckAuT2VF7twj8ElMD0LRGjZ
bSzBRHUiTpvcUmxS7o/9az9xoL5SMOgrpIe0twOOPANyuDwkvCqjY/0yvhe4EcWe
3ahrh5hLqD3REexa7Gsj3hyBDgmayw4DRdm9A9ohy+A+c8bBsmFkp/kfUF4WR4ud
6ROh12vO8DPixPjuvaUoTCgQgGdhdMnq8cOIuX3RBqgX36i4/ohEEOV/AzaIacYP
ALh23vJPRnoGcCtsjJRGsJkhMK17ZfxcuwmyGXK0XJaaKpTBLCTtfk5Z3RbV7TMo
RPMUctzRIpYJDwiBLEbfMWlTk+McZFCQf6fZHTQQMHkqxEtu83A7FNPzRYPLXlYH
tXU4Q5Whsg2SzEleP3YqfxoQuJelAuOe4KG13+So+BNK4o4j/eHHiv9hypN9oYdr
cfAmtkEqL5ybuvfirSDBulCzAUWArZgwRmd9F17S9nFSV/8lYXF+d8BNROnHMvGm
FnssTFwLZKleQVvHEvOq4nAZOSIE66KiCUI/rs84NqLKdmKZu5wnWv1qxdP2GnHD
Fdz4qO1YW6hiKEn971gOsBCzP74WtPb68Bu4y7Ys+8PAHMdzvn75xP9XP0lTD2am
YpRa7vfI1V/3c3NLG5fELc2ftQUY/eCal3VQWlO5Nbo6NUNZ70d7nd6rrJ5pzPkN
SFtHnZesadb8i+/KUcLf43WHwK8A/as0djZjpVreHLtpGZeom8LK/g==
-----END RSA PRIVATE KEY-----
The first two lines indicate the private key is encrypted with 3DEC encryption method and 6BC52F8B3C9C2F3E is the encrypted password. If we use newkey.pem directly, the apache server will ask for pass phrase during the configuration time and fails if we use apachectl script. To avoid the problem of entering the pass phrase, we can remove the pass phrase protection on the server private key with the following openssl command.
If we use fc6SserverPrivateKey.pem as server.key directly, the apache web server will ask for pass phrase during the configuration time and fails if we use apachectl script. To avoid the problem of entering the pass phrase, we can remove the pass phrase protection on the server private key with the following openssl command.
[root@fc4 conf]# cd /etc/httpd/conf/ssl.key [root@fc4 ssl.key]# cp server.key server.key.new [root@fc4 ssl.key]# openssl rsa -in server.key.new -out server.keyThis removes the first two lines from the file as shown below:Enter pass phrase for server.key.new: writing RSA key
  -----BEGIN RSA PRIVATE KEY-----

dWSWcjNzqmcMXV6rOTzsTFdgdXqEh96FkZlmH7LdMiCvslyCyjcaltPfhYb3wiLX
TOd3kpUn2jvD0vLriapT0ZByMvDJ9dbIie1JMQb8XckAuT2VF7twj8ElMD0LRGjZ
bSzBRHUiTpvcUmxS7o/9az9xoL5SMOgrpIe0twOOPANyuDwkvCqjY/0yvhe4EcWe
3ahrh5hLqD3REexa7Gsj3hyBDgmayw4DRdm9A9ohy+A+c8bBsmFkp/kfUF4WR4ud
6ROh12vO8DPixPjuvaUoTCgQgGdhdMnq8cOIuX3RBqgX36i4/ohEEOV/AzaIacYP
ALh23vJPRnoGcCtsjJRGsJkhMK17ZfxcuwmyGXK0XJaaKpTBLCTtfk5Z3RbV7TMo
RPMUctzRIpYJDwiBLEbfMWlTk+McZFCQf6fZHTQQMHkqxEtu83A7FNPzRYPLXlYH
tXU4Q5Whsg2SzEleP3YqfxoQuJelAuOe4KG13+So+BNK4o4j/eHHiv9hypN9oYdr
cfAmtkEqL5ybuvfirSDBulCzAUWArZgwRmd9F17S9nFSV/8lYXF+d8BNROnHMvGm
FnssTFwLZKleQVvHEvOq4nAZOSIE66KiCUI/rs84NqLKdmKZu5wnWv1qxdP2GnHD
Fdz4qO1YW6hiKEn971gOsBCzP74WtPb68Bu4y7Ys+8PAHMdzvn75xP9XP0lTD2am
YpRa7vfI1V/3c3NLG5fELc2ftQUY/eCal3VQWlO5Nbo6NUNZ70d7nd6rrJ5pzPkN
SFtHnZesadb8i+/KUcLf43WHwK8A/as0djZjpVreHLtpGZeom8LK/g==
-----END RSA PRIVATE KEY-----
Now it is important to protect the server.key by "chmod 700 server.key" Restart the web server with
"service httpd restart"
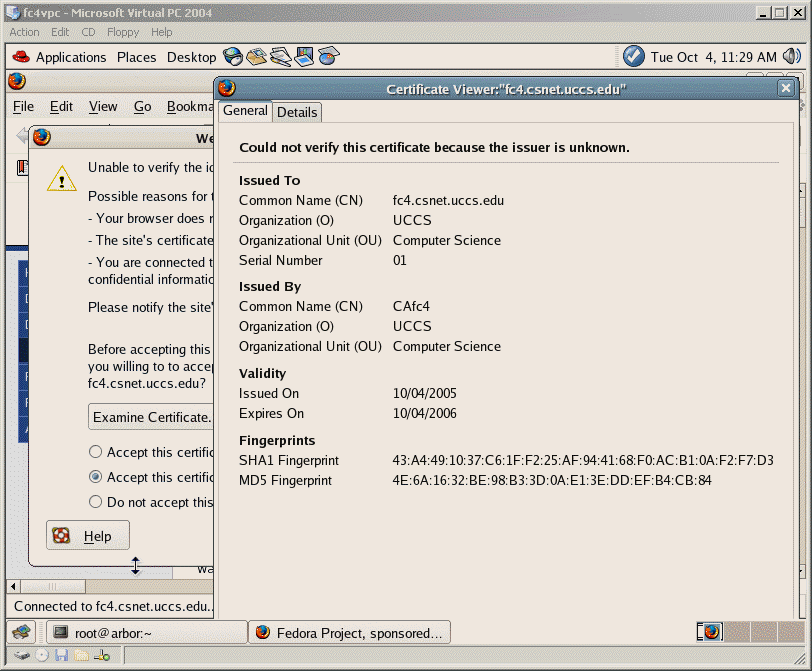
Start the Firefox web browser on FC6. When we type in https://fc6.csnet.uccs.edu/, we should see the prompt for allowing us to examine the server certificate. Click "Examine Certificate" to see the server certificate.
Hit Ctrl-Alt to exit cs591fc6 and click the title bar of cs591fc6 to make cs591fc6 as an active window.
Use Control-Alt-PrtSc to capture the active window (cs591fc6) with the server certificate.
Here is the capture image of the server certificate on fc6.csnet.uccs.edu.
Save your captured image in your CS Unix web site and email me the url. Here is the captured image of the server certificate on fc6.csnet.uccs.edu.
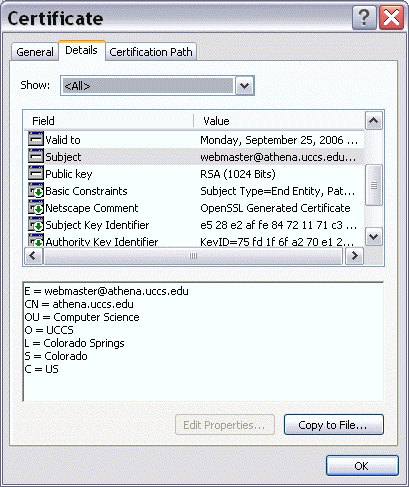
Here is how IE Browser displays the Athena.uccs.edu server certificate
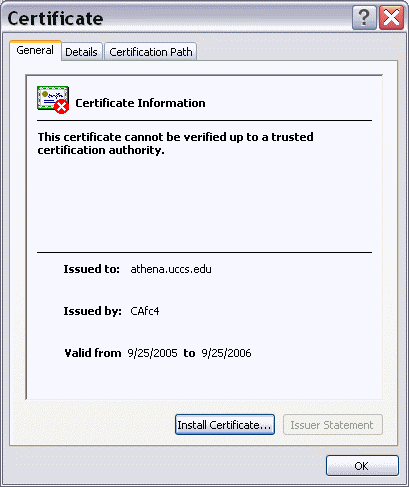
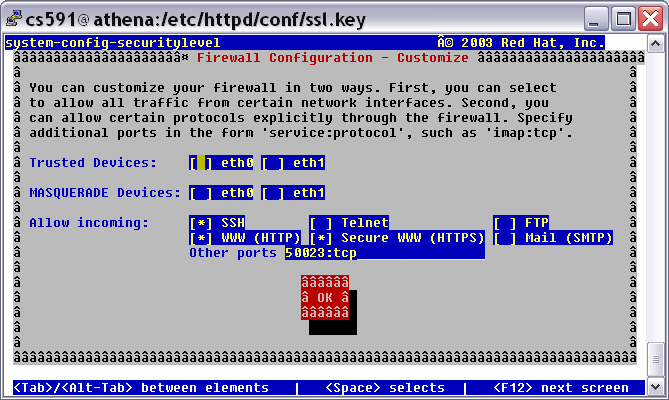
Note that on a real server such as Athena.uccs.edu, when configuring with a secure web server, you need to open the firewall to allow secure web access, otherwise, you will still get the "page not found" error. To open the customized firewall access, you can use the "lokkit" command to bring up the firewall configuration menu. The select "customize" menuitem and "secure www (https)".
Add the following directives to /etc/httpd/conf/httpd.conf
SSLVerifyClient none
<Directory /var/www/html/secure>
SSLVerifyClient require
SSLVerifyDepth 5
SSLCACertificateFile conf/ssl.crt/ca.crt
SSLCACertificatePath conf/ssl.crt
SSLOptions +FakeBasicAuth
SSLRequireSSL
AuthName "UCCS CS Department"
AuthType Basic
AuthUserFile /etc/httpd/conf/httpd.passwd
require valid-user
</Directory>
Add the following line to the /etc/httpd/conf/httpd.passwd
/C=US/ST=Colorado/L=Colorado Springs/O=UCCS/OU=Computer Science/CN=chow/emailAddress=chow@cs.uccs.edu: xxj31ZMTZzkVA
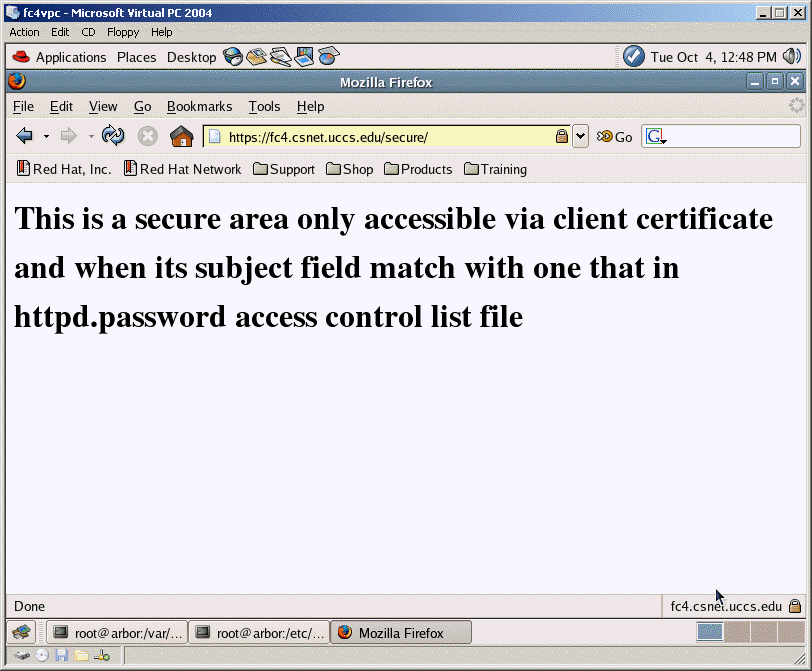
You should replace chow with your own CN and chow@cs.uccs.edu with your own email address. The encrypted password xxj31ZMTZzkVA should not be changed. All entries in httpd.passwd should contain the same fake password. No space after it. If you do not see httpd.passwd, create one. The above client certificate verification using FakeBasicAuth option is implemented in line 1836 of ssl_hook_UserCheck() of ssl_engine_kernel.c (http://cs.uccs.edu/~cs591/httpd-2.0.54/modules/ssl/ssl_engine_kernel.c) Note that the string "xxj31ZMTZzkVA" is used as the password in the user file and it is just the crypted variant of the word "password". Since we specify in the above "SSLCACertificateFile conf/ssl.crt/ca.crt" to use the public key in this CA certificate to verify the client certificate, we need to copy the CA certificate from /usr/share/sshl. Use the following command: cp /etc/CA/cacert.pem /etc/httpd/conf/ssl.crt/ca.crt Make sure to include all subject field of the client certificate. The example in SSL-how-to does not include /ST, /O, and /emailAddress fields and does not seem to work with apache2.0.52 on fc3. Create a secure directory under /var/www/html. With index.html contains: <h1> This is a secure area only accessible via client certificate and subject field match the httpd.passwd list.</h1>
cd /etc/pki/tls Use misc/CA -newreq and misc/CA -sign to create clientCert.pem and clientPrivateKeyCR.pem. Similar to the creation of server certificate. Use your login name as Common Name. and your uccs email address as emailAddress.
misc/CA -newreq
misc/CA -sign
cp newcert.pem clientCert.pem
cp newkey.pem clientKey.pem
Since Netscape or Firefox only accept pkcs12 format. We use pkcs12 utility command of openssl to export the client certificate with the format. openssl pkcs12 -export -in clientCert.pem -inkey clientKey.pem -out Client.p12
[root@localhost tls]# openssl pkcs12 -export -in clientCert.pem -inkey clientKey.pem -out <yourLogin>Client.p12
Enter pass phrase for clientKey.pem:XXXXXXX
Enter Export Password: YYYYYYYY
Verifying - Enter Export Password: YYYYYYYY
You will be asked to enter the pass phrase and export password. The export password will be asked for when we install on client browser. Note that here we are exporting both the private key and the client certificate, all in the same file protected by the export password. Make sure you carry/transmit them in a secure manner.
Besides creating a client certificate with your login name.
Repeat the above process and create a client certificate with cs591 as CN and cs591@cs.uccs.edu as email address field. It will allow us to check whether the server rejects the access when presented with an client certificate not in the httpd.passwd list.
Restart the web server with "service httpd restart"
Copy <yourLogin>Client.p12 and cs591Client.p12 to root directory. In real word, the user will transfer password protected the client certificate to the local machine for installation. Import your client certificate to your browser.
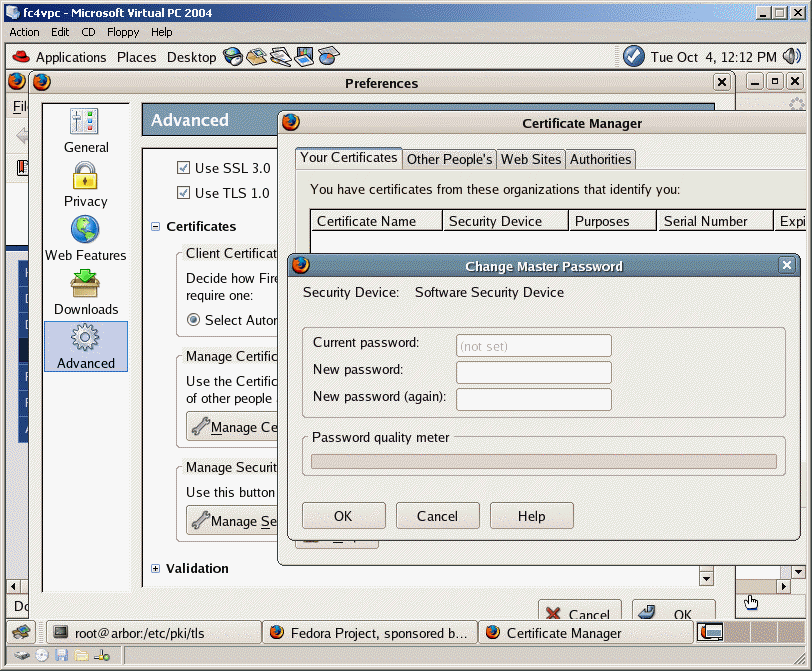
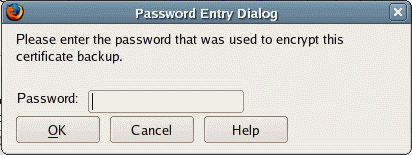
You will be asked to enter a password for encrypting the certificate backup.
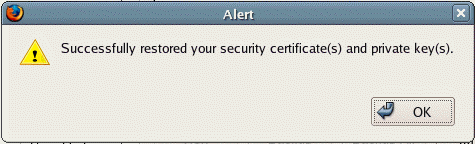
You will get "Successfully restored your security certificate(s) and private key(s). Click OK.
Click OK on Certificate Management.
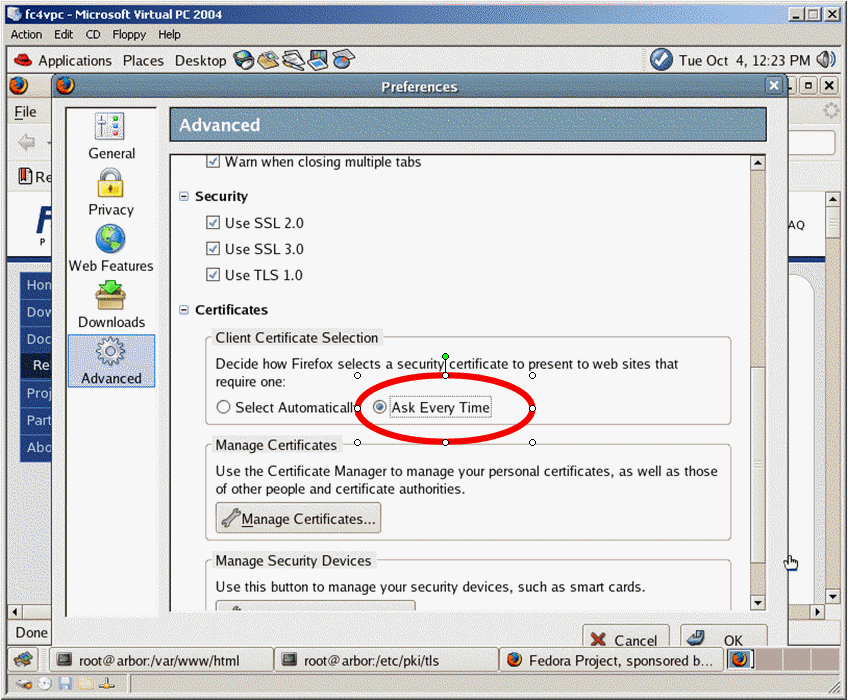
Repeat the above to set up the cs591 client certificate.Make sure select the
"ask every time" as client certficate selection option.
Otherwise a client certificate will be selected automatically for you.
Let us now access the https://fc6.csnet.uccs.edu/secure/ and take a snapshot of the browser. Note that the browser will prompt the user to select client certificate as it is shown with "User Identification Request" window on the right side of the screendump.
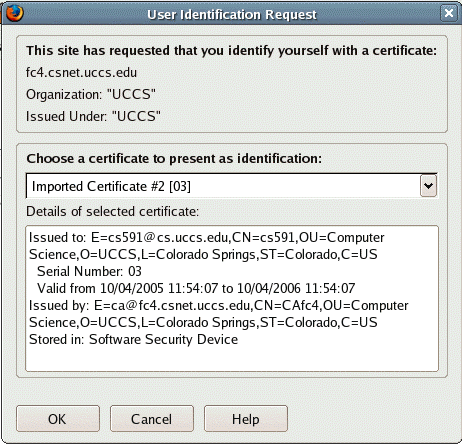
Instead of the cs591 client, you should choose your
client certificate. Click the drop down list to select the right one.
Take a snapshort of the client certifciate presented
by the browser.You should see the secure web page displayed.
If we set up fc6se with the 2nd network interface and assign 10.0.0.56, we will be able to access the fc6.csnet.uccs.edu server from xpvm1 virutal machine. The following is the step for setting up IE with personal ceritificate. This is optional for your hw3.
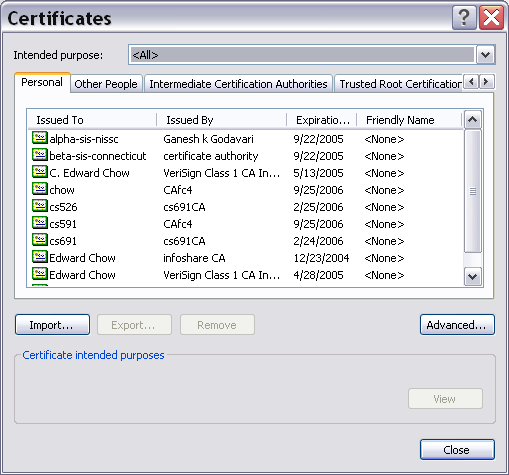
On IE, we can import the personal certificate by selecting Tools | Internet
Options and select Content tab and certificates button.
Select personal tab and import button.
Certificate import wizard will appear. Click browse and select the person
certificate file such as chowClient.p12. You may need to change the file type
from X509 to personal information exchange (*.pfx, *.p12) to see you p12
file.
Click next. Enter the password for protecting the private key. click next,
click finish. The certificate is install.
You can see it installed similar to this