XenAPI
- [root@wind ~]# xe vm-install template=CentOS\ 5.0 new-name-label=CentOS\ 5\ (64-bit) f227b092-3810-97ba-f074-4e9a46d82c7a
-bash: syntax error near unexpected token `('
[root@wind ~]# xe vm-install template=CentOS\ 5 new-name-label=c5 f227b092-3810-97ba-f074-4e9a46d82c7a
Error: No templates matched
[root@wind ~]# xe vm-install template=CentOS new-name-label=c5 f227b092-3810-97ba-f074-4e9a46d82c7a
Error: No templates matched
[root@wind ~]# xe vm-clone uuid=`xe template-list name-label=Red\ Hat\ Enterprise\ Linux\ 6\ \(64-bit\) –minimal` new-name-label=”CentOS 6.0 (64-bit)”
-bash: syntax error near unexpected token `('
[root@wind ~]# xe template-list name-label=Red\ Hat\ Enterprise\ Linux\ 6\ \(64-bit\) –minimal
Error: Unknown field '–minimal'
[root@wind ~]# xe template-list name-label=Red\ Hat\ Enterprise\ Linux\ 6\ \(64-bit\)
uuid ( RO) : 515b5edd-6cf7-d568-dd03-b802015b1d57
name-label ( RW): Red Hat Enterprise Linux 6 (64-bit)
name-description ( RW): Template that allows VM installation from Xen-aware EL-based distros. To use this template from the CLI, install your VM using vm-install, then set other-config-install-repository to the path to your network repository, e.g. http://<server>/<path> or nfs:server:/<path>
- [root@wind ~]# xe vm-clone uuid=515b5edd-6cf7-d568-dd03-b802015b1d57 new-name-label="CentOS 6.0 (64-bit)"
58d3a0ad-c338-2afa-61ee-a9810ba99855
[root@wind ~]# xe vm-install template="CentOS 6.0 (64-bit)" new-name-label="centos6vm" sr-uuid=f227b092-3810-97ba-f074-4e9a46d82c7a
ccb29b02-e35c-de98-567c-712e54e69273
[root@wind ~]# xe network-list bridge=xenbr0 --minimal
09c70b3b-686c-f8a4-a37c-f907d4d0efa7
[root@wind ~]# xe vif-create vm-uuid=ccb29b02-e35c-de98-567c-712e54e69273 network-uuid=09c70b3b-686c-f8a4-a37c-f907d4d0efa7 mac=random device=0
08f697ab-7f9c-3331-2789-45782c9c6f82
[root@wind ~]# xe vm-param-set uuid=ccb29b02-e35c-de98-567c-712e54e69273 other-config:install-repository=http://mirror.uccs.edu/centos/6/
[root@wind ~]# xe vm-start uuid=ccb29b02-e35c-de98-567c-712e54e6927
Error: No matching VMs found
[root@wind ~]# xe vm-start uuid=ccb29b02-e35c-de98-567c-712e54e69273
Error code: INVALID_SOURCE
Error parameters: Unable to access a required file in the specified repository: http://mirror.uccs.edu/centos/6/isolinux/vmlinuz., ,
[root@wind ~]# xe vm-param-set uuid=ccb29b02-e35c-de98-567c-712e54e69273 other-config:install-repository=http://mirror.uccs.edu/centos/6/os/x86_64/
[root@wind ~]# xe vm-start uuid=ccb29b02-e35c-de98-567c-712e54e69273[root@wind ~]#
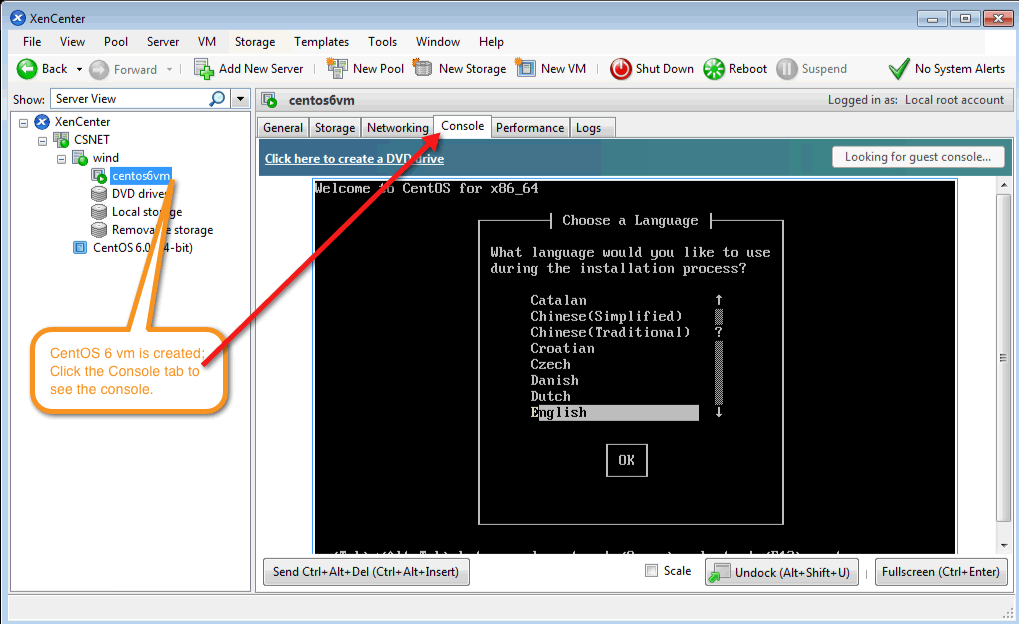
- From XenCenter we can see the new vm is created with repository pointed to http://mirror.uccs.edu/centos/6/os/x86_64/ ready to start the installation process

[root@wind ~]# xe vm-install template="CentOS 5 (32-bit)" new-name-label="centos5vm" sr-uuid=f227b092-3810-97ba-f074-4e9a46d82c7a
532c8710-fea3-38d8-b8b3-d7c555c99dc2
[root@wind ~]# xe network-list bridge=xenbr0 --minimal09c70b3b-686c-f8a4-a37c-f907d4d0efa7
[root@wind ~]# xe vif-create vm-uuid=532c8710-fea3-38d8-b8b3-d7c555c99dc2 network-uuid=09c70b3b-686c-f8a4-a37c-f907d4d0efa7 mac=random device=0
672f3b18-9dec-6884-f92c-8c04030132ad
[root@wind ~]# xe vm-param-set uuid=532c8710-fea3-38d8-b8b3-d7c555c99dc2 other-config:install-repository=http://mirror.uccs.edu/centos/5/os/i386
[root@wind ~]# xe vm-start uuid=532c8710-fea3-38d8-b8b3-d7c555c99dc2
[root@wind ~]# ssh -l root centos5.csnet.uccs.edu
The authenticity of host 'centos5.csnet.uccs.edu (128.198.60.206)' can't be established.
RSA key fingerprint is 0c:a9:67:9d:c7:af:99:4b:f9:bd:7a:33:43:78:71:b2.
Are you sure you want to continue connecting (yes/no)? yes
Warning: Permanently added 'centos5.csnet.uccs.edu,128.198.60.206' (RSA) to the list of known hosts.
root@centos5.csnet.uccs.edu's password:
Last login: Thu Dec 29 00:41:25 2011
[root@centos5 ~]# df
Filesystem 1K-blocks Used Available Use% Mounted on
/dev/mapper/VolGroup00-LogVol00
5935604 2850436 2778788 51% /
/dev/xvda1 101086 13745 82122 15% /boot
tmpfs 524380 0 524380 0% /dev/shm
XCP Expiry bug:
- Adbullah,
I was able to install xencenter on my office PC and it says XCP1.1 on wind will expire in 25 days. It is not consistent with what was claimed in xcp site where xcp is free.
Maybe XenCenter is for critix products and the XCP is originally derived from xenserver contributed by Critix. Perhaps XenCenter misinterpreted the version of Xen on wind (3.4.2).
I also found XCP1.1. is running Xen 3.4.2, an older version of Xen. Current Xen release is 4.1.2.
Look like XCP has only two people working on it and they are working on project kronos to port the XenAPI to Debian and Ubuntu (instead of fedora).
Even though citrix is trying to make XCP as pre-release of their xenserver, similar to the relationship between fedora and redhat, they are far behind in terms delivery schedule (XCP 1.5) and man-power.
...
xentop - 20:25:03 Xen 3.4.2
1 domains: 1 running, 0 blocked, 0 paused, 0 crashed, 0 dying, 0 shutdown
Mem: 33544412k total, 1214052k used, 32330360k free CPUs: 8 @ 3059MHz
- Abdullah found the fix:
I
just found this way to extend the XCP license expiration date. I hope it deals the problem.
http://ronnybull.com/2011/07/15/xen-cloud-platform-xcp-license-expired-after-30-days/
I haven’t used it because I use the activation key that I got from Citrix.
July 15th, 2011 by Ronny
If you do a clean install of XCP 1.0 or XCP 1.1 Beta you will find that after 30 days and a reboot none of your virtual machines will boot. If you are using XenCenter to manage your server you will see a notification that your license has expired. This is a bug in the current releases of XCP, and should be fixed in future releases. To fix the issue with a quick hack do the following:
Stop the XAPI service
Edit the file /var/xapi/state.db and search for 'expiry'. The field should look something like this:
('expiry' '20110810T00:00:00Z')
|
Change it so that it reads 30 days or more into the future.
('expiry' '20110910T00:00:00Z')
|
Restart the XAPI service
You should be able to start all of your virtual machines again. You will need to perform this task again in 30 days until this check is removed from later releases of XCP.
Here is a small script that can be setup in cron to automate the task.
1
2
3
4
5
6
7
8
9
10
11
12
13
14
15
16
17
18 |
#!/bin/bash
#Script to fix XCP 30 License expire issue
#Script increases the month value by 1
#By: Ronny L. Bull & Alex Stuart
#Version: 1.0
#Date: 8-9-2011
FUTURE=`date --date="next Month" '+%Y%m%d'`
#stop xapi service
/etc/init.d/xapi stop
#Replace the expiry entry
sed -i "s/\(expiry.\{3\}\)[0-9]\{8\}/\1$FUTURE/" /var/xapi/state.db
#start xapi service
/etc/init.d/xapi start
|
- name__label="wind" name__description="Default install of XenServer" power_on_mode="" license_params="(('sku_type' 'free') ('version' '1.1.0') ('serialnumber' '') ('sockets' '1') ('productcode' '') ('expiry' '20120124T00:00:00Z') ('grace' 'no') was changed to
name__label="wind" name__description="Default install of XenServer" power_on_mode="" license_params="(('sku_type' 'free') ('version' '1.1.0') ('serialnumber' '') ('sockets' '1') ('productcode' '') ('expiry' '20121224T00:00:00Z') ('grace' 'no')
Redhat 6.2 installation problem
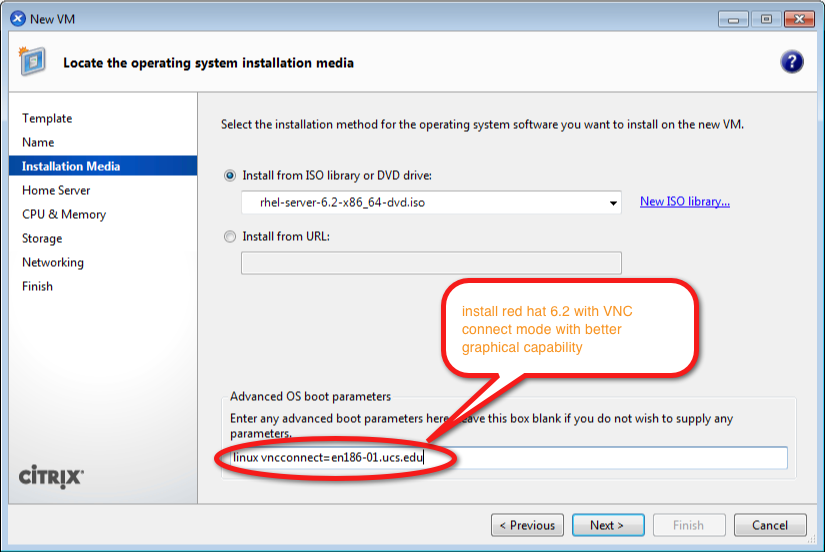
- The text based direct installation of Redhat 6.2 resulting a basic core Linux without important services include yum and httpd. To enable graphical based installation remotely from XenCetnter. We can use a VNC Connect installation mode.
- http://docs.redhat.com/docs/en-US/Red_Hat_Enterprise_Linux/6/pdf/Installation_Guide/Red_Hat_Enterprise_Linux-6-Installation_Guide-en-US.pdf
- page 402.
- 31.2.2. Connect Mode
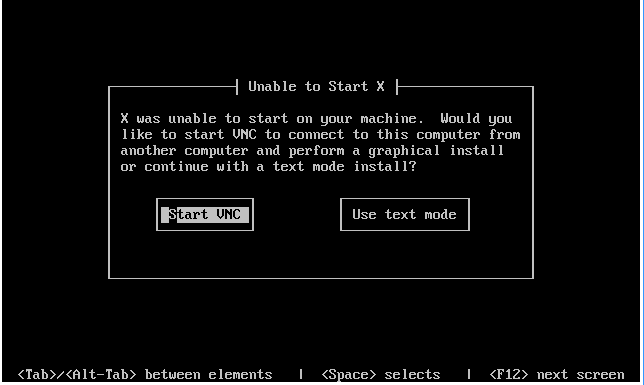
Certain firewall configurations or instances where the target system is configured to obtain a dynamic
IP address may cause trouble with the direct VNC mode in anaconda. In addition, if you lack a console
on the target system to see the message that tells you the IP address to connect to, then you will not
be able to continue the installation.
The VNC connect mode changes how VNC is started. Rather than anaconda starting up and waiting
for you to connect, the VNC connect mode allows anaconda to automatically connect to your view. You
won't need to know the IP address of the target system in this case.
To activate the VNC connect mode, pass the vncconnect boot parameter:
boot: linux vncconnect=HOST
Replace HOST with your VNC viewer's IP address or DNS host name. Before starting the installation
process on the target system, start up your VNC viewer and have it wait for an incoming connection.
Start the installation and when your VNC viewer displays the graphical installer, you are ready to go.
31.3. Installation Using VNC
Now that you have installed a VNC viewer application and selected a VNC mode for use in anaconda
- To do this, first during the setup of New VM on XenCenter, specify the boot parameter with Linux vncconnect=en186-01.uccs.edu where en186-01.uccs.edu is the machine running vnc viewer.
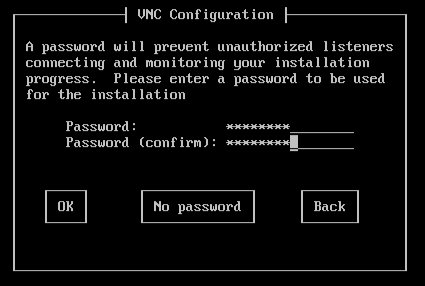
- Protection with vnc password
- See the Redhat 6.2 vm installation with XenCenter video.
- vSphere Client has a much better console with excellent graphical displaying and installation capabilities.
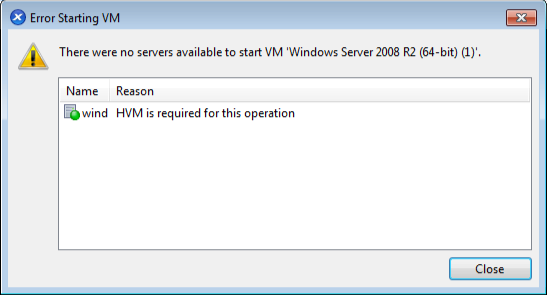
Windows VM Installation
- HVM is required to turn on in BIOS to install Windows VMs
This worked on the master but on the slaves it keeps saying that it has expired. Has any one else run into this?
Did you make the change on the slaves as well or just the master?
Ronny, I’m using XCP – 1.1.0-48877c and get noticed that if I put an expiry date beyond 2013, the message expiry starts again. Is it normal ? If so, even your workaround will fail.
Why it is happening ?
Did I do something wrong ?
Thank you.