The Scripter Interface
|
Maté Safe and Rapid Sensor Network Programming Last updated 22 Mar. 2004 |
Maté allows users to program TinyOS networks with short, high level event handler scripts. Users install a virtual machine TinyOS application on motes, and a Java application compiles scripts to the VM bytecodes. These bytecodes run in a sandboxed VM environment, so buggy programs cannot crash a mote. Event handlers have version numbers, and motes automatically install new versions they hear. Once a single copy of a newer program is installed, the network will automatically propagate it to every node.
Maté simplifies programming by providing a synchronous
interface to TinyOS operations. For example, the
send() function blocks until the underlying
sendDone event is handled by TinyOS. This makes code
much less complex, especially for novice programmers. Currently,
Maté programs are written in a simple, BASIC-like scripting
language called TinyScript. We are working on making the
architecture flexible enough for alternative scripting language
options.
As the core of Maté is a virtual machine, it also provides a form of execution protection. Unlike TinyOS applications, which have no user/kernel boundary, Maté programs cannot crash a mote or render it unresponsive. Maté catches errors at run time (e.g. accessing an invalid heap variable) and has a mechanism for alerting a user to them (all the LEDs blink and it sends a message), including simple debugging information on the code that caused the error.
Maté has an event-based execution model; pieces of code are run in response to events, such as a timer or a packet reception. The presence of blocking operations requires that event handlers be able to run in parallel; the presence of shared variables could make race conditions a significant problem. Maté handles this issue by having handlers implicitly lock all shared resources they use; the set of shared resources used is computed with a full program analysis when code is installed. Therefore, a programmer can write several Maté event handlers that share variables and be sure there will be no race conditions without having to consider the necessary synchronization.
Maté allows users to build customized virtual machines for specific application deployments. However, it also has two simple example VMs which you can build and use.
Maté's code resides in two directories. The first,
tools/java/net/tinyos/script is the Java toolchain
for building VMs and writing scripts. The second,
tos/lib/VM, is the actual VM TinyOS code.
The first step to using Maté is to build the Java
toolchain. Go to tools/java/net/tinyos/script and
type make. This builds the two principal tools,
VMBuilder and Scripter, as well as all of their supporting code
(parsers, etc.).
Once you've built the toolchain, the next step is to build a
Maté VM and associated scripting environment. Go to
tos/lib/VM/samples. You should see two files:
bombilla.vmsf and simple.vmsf. These
files describe VMs. Build Bombilla by typing:
|
samples
directory. You should see output similar to this:
|
Running VMBuilder on this file creates an
application in tinyos-1.x/apps/Bombilla. There should
be four files: Makefile,
MateConstants.h, MateTopLevel.nc and
vm.vmdf.
Go there and type make pc. Running make should
create a new directory, vm_specific, which contains
several Java classes for the Bombilla VM, as well as build a
TOSSIM version of the VM. You can correspondingly make
mica2 for mica2 nodes. Note that every time you build a
Maté executable, make regenerates the Java
files. Correspondingly, make reinstall.num can be
useful.
Build Bombilla for the hardware that you have. Install the VM
on a single node, with ID 0 (make reinstall.0). Plug
that mote into your serial port. Then, from the Bombilla
directory, type
|
-comm serial@COM2 or -comm
sf), change the parameter correspondingly.
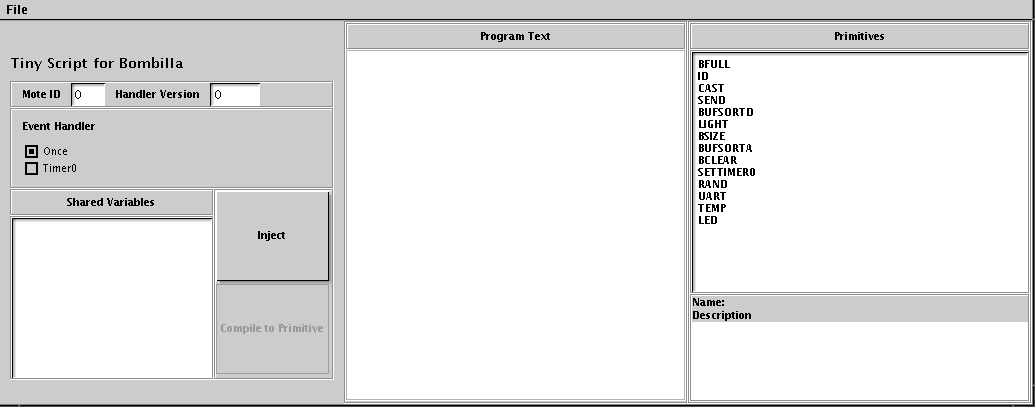
This will load a Scripter interface for Bombilla. It should look something like this:
This is the interface for writing scripts to install on a Maté network.
The Scripter interface is broken into three major parts. We'll step through each of them, one by one.
The left panel has two fields, Mote ID and Version Number. In Mote ID you should enter the ID of the mote at the end of the serial port; in this case, it's 0, so you don't need to change anything. You generally do not need to change the Version Number field; the interface will take care of that for you. However, sometimes you need to manually change it. For now, leave it alone.
Below the two fields is a selection for which event handler you which to program. The Bombilla VM has two event handlers: Once and Timer0. The Once event handler runs once, when new code is installed. Timer0 runs periodically at some frequency. By default, it is disabled. Other VMs can handle different events than these, such as packet reception, target detection, or processing requests. Bombilla is a simple one, however, so only has these two.
Below the selection is an area called Shared Variables. As a later section shows, scripts can declare variables that are shared across scripts. This area displays all of the shared variables currently in use. For now, it's empty. To the right of this display is the Inject button, and a greyed-out button, which you can ignore. Inject is used to introduce a new program to a network.

The center panel has a single area, Program Text. This is where you write TinyScript code to compile and install in a network.
The right panel has two areas. On top is a list of Primitives. These are functions, beyond general TinyScript operations, that scripts can call. Selecting one of them brings up a brief description in the lower panel.
When you quit Scripter, you should always do so through the File menu. Scripter saves some state about the current session to a file, and quitting without using this menu item prevents this from happening.
Select the Timer0 handler in the left panel. Then
type this program into the program text area:
|
counter, which it increments each time it
executes. It then calls led() with the low three
bits, to display them. Press Inject.
In the shell you started Scripter from, you should see output similar to this:
|
When the Timer0 event fires, Maté will run this
code. However, Timer0 doesn't fire when the VM boots. We need to
tell the VM to start firing Timer0. We'll do this with the Once
handler. We'll need to use one of the Primitives,
settimer0. Click on it in the right panel to read its
description.
Select the Once handler, and type this program:
|
TinyScript programs have two sections. The first is the
variable declaration region. In the Timer handler above, this was
the private counter; statement. All variables must be
declared before any statements. There are three kinds of
variables: private, which only that handler can
access, shared, which all handlers can access, and
buffer variables, which are shared. For example, this
program declares a shared variable, a private variable, a buffer,
and turns on the red LED:
|
!, which comments out
everything until the end of line.
Private and shared valuables can be either sensor readings,
generated by primitives such as temp or
light, or integers. Sensor readings are immutable;
trying to modify them will result in a run-time error. You also
cannot compare with with anything except sensor values of the same
type (e.g., light with light). For example:
|
cast
primitive. This is a version of the above program that will execute
without a run-time error:
|
Buffers are indexed with []; by default, they have
ten elements. An empty index implies the tail of the buffer;
call cast(buf[]); will return an integer value of the
end of the buffer, while buf[] = 0; will append to a
buffer.
Buffers are typed. An empty buffer has no type. The
bclear primitive empties a buffer. A buffer takes the
type of the first element put into it (integer, light reading,
etc.), and a run-time error occurs if any other type is put into
it. Here is a program that sends a light reading over a tree-based
ad-hoc collection routing protocol:
|
TinyScript supports basic arithmetic operations, such as
addition (+), multiplication (*),
division (/), modulus (%), as well as
boolean operations such as and (AND) as well as or
(OR), as well as their binary (logical) equivalents
(&, |).
Primitives are invoked with the call keyword
(e.g., call led(1);). If the primitive has a return
value (check its documentation), it must be stored. For example,
rand() returns a random value. call
random(); will cause a compile error, while rval =
call
    random();
will not.
Control structures include if ... then as shown
above, as well as loops. For example, to put ten successive light
values into a buffer:
|
There are a limited number of buffers and variables. By default, there are 16 shared variables, eight private variables (per handler), and eight buffers.
A full reference for TinyScript can be found in the standard documentation directory. This tutorial only covers a few major points.
When Maté encounters an error in a program (e.g. trying to add a light and temperture value), it enters an error state. In this error state, it stops running capsules. Instead, it periodically toggles all of the LEDs (all of them blinking on and off is an indication something has gone wrong) and sends a packet over the UART. The packet is a MatéErrorMsg and contains information on the cause of the error.
Here is a simple program, where each mote will periodically (one every ten seconds) sample its temperature and light sensors, but those values into a buffer, and route those to a base station. Note that, for this to work, there must be a routing base station (a node with ID 0).
If Timer0 is running from the earlier part of the tutorial,
stop it with the Once handler by call
settimer0(0);. Then, install this as Timer0:
|
|
call settimer0(100);.
By default, multiple Maté handlers can run concurrently; the VM interleaves their execution at instruction-level granularity. When there are shared variables (and buffers), this can lead to possible race conditions. Using installation-time program analysis, Maté ensures race-free, deadlock-free execution of handlers. If two handlers can safely run concurrently (they share no variables), then the scheduler lets them do so.
This can fail due to handler installation. Notably, as handlers are installed immediately upon reception, a context can be in the midst of a computation when it is halted due to new code being installed.
This means that to ensure perfect data consistency, the values of shared variables cannot be transferred from one version of a handler to the next. For example, before installing a new version of the clock handler, one could install a clock handler that clears out the shared variables, restoring them to a consistent state.
We are currently working on a handler installation mechanism that will preserve execution atomicity; this understandably becomes difficult in the presence of buggy handlers that do not halt.
This document just touches on Maté and some simple programs that you can write with the example Bombilla VM. Maté allows you to build customized VMs, with user-specified event handlers and primitives. For example, you can build a scripting environment that receives and sends packets, reacts to target detection, or acts as a data aggregation engine. For more information, please refer to the Maté manual
Maté is in active development. If you find bugs, please
enter them in the TinyOS bug tracker on
Sourceforge. Feature requests and questions should be sent to the
standard TinyOS users list,
tinyos-users@millennium.berkeley.edu. You can sign up
here.