Goal:
- Learn
how to configure apache as
- web
server.
- cache server
- reverseproxy
- Learn
how to form a single cluster using reverseproxy.
- Learn
how to use httperf to evaluate the web server performance.
Assignment
Date: 1/25/2005
Due Day:
2/1/2005
Description:
Part 1. Create a personal web
page with your email, recent photo (close-up similar to passport photo,
so that we can recognize your face) and your research interests in advanced
Internet and web systems. Put your recent photo in ~<login>/public_html/images/<login>.[jpg|gif|png].
Email me the url of the web page by 1/29/2005.
Part 2. Exercise 1. Configure
apache to run as a web server
- In this exercise,
we will learn how to configure apache to run as a web server.
- On our CS Unix machines, there
is a httpd program in /usr/sbin/. It is the Apache HyperText Transfer Protocol
(HTTP) server program. It is designed to be run as a standalone
daemon process. Read man page with "man httpd" for more info.
SYNOPSIS
httpd [ -X ] [ -R libexecdir ] [ -d serverroot ] [ -f con-fig ] [ -C directive
] [ -c directive ] [ -D parameter ]
- If "/usr/sbin/httpd -d /users/server/students/cs526/public_html/apache/ws1
-X" is run, the httpd program will treat /users/server/students/cs526/public_html/apache/ws1
as serverroot directory and read the directives in the conf/httpd.conf file
for configuring the apache server. -X is for debugging purpose, it indicates
to the httpd daemon that do not fork spare child process for improving performance.
Just run a single standalone process.
- The Apache provides a rich set
of directives for configuring/customizing the web server. A subset of directives
are realized by an Apache module. See http://blanca.uccs.edu/manual/mod/directives.html
for the set of runtime directives.
- An example of httpd.conf is
LoadModule log_config_module
/etc/httpd/modules/mod_log_config.so
LoadModule access_module /etc/httpd/modules/mod_access.so
User
cs526
ServerName sanluis.uccs.edu
Port 8388
DocumentRoot
/users/server/students/cs526/public_html/apache/ws1/htdocs
ErrorLog
logs/error_log
TransferLog logs/access_log
PidFile logs/httpd.pid
- The first directive LoadModule
tells the httpd program to dynamically load in /etc/httpd/modules/mod_log_config.so
as dynamic shared object (very much like dll). The log_module code deals
with creating error log entries in the log files.
- Access_module deal with creating
access log entries in the log files.
- User directives tells httpd to
run itself as cs526 account.
- ServerName tells httpd the domain
to use when displaying error msg.
- Port directive tells httpd to listen
to port 8388 for incoming http requests. We need to enter http://sanluis.ccs.edu:8388/
to access this webserver.
- DocumentRoot specifies the actual
path to the default web document directory.
- EorrLog specifies the name of the
file for saving error log records.
- TransferLog specifies the name
of the file for saving the access records.
- PidFile specifies the names fo
the files for saving the process id of the httpd server. It can be used
by system admin to restart or stop the httpd server.
Unfortunately, the cache module was
removed from the apache 1.3 in apache 2.0. I just recompiled apache 1.3.28.
To simplify the task, instead of using the tempate file in ~cs526/public_html/apache
we will use ~cs526/public_html/apache1.3
- For exercise1, we would like you
to copy the directory ~cs526/public_html/apache1.3 to your ~<login>/public_html
directory, using "cp -r ~cs526/public_html/apache1.3 ~<login>/public_html.
- login to blanca.
- cd public_html/apache/ws1/conf
- edit httpd.conf file by replacing
all LOGIN instances with your own login name on CS Unix machines. In other
words,
- Replace ccount on User directive
with your own account.
- Replace DocumentRoot and point
to your own htdocs directory.
- Replace ErrorLog, TransferLog,
and PidFile with your own directory.
- Replace the port number with 8<last
3 digits of your SS#> in the Port directive.
- "cd ../htdocs" to web
server default document directory.
- Edit the index.html in htdocs directory
with your login name.
- Edit the cmd file substitute the
"cs526/public_htlm" string there with "<your loginname>/public_html".
- Run the apache web server with
"./cmd
which is
"/users/server/students/cs526/apache_1.3.28/src/httpd -d /users/server/students/LOGIN/public_html/apache1.3/ws1
-X"
- Go to any browser and enter "http://blanca.uccs.edu:8<last
3 digits of your SS#>/index.html" and see if the web page shows
up.
- Note that we need add index.html
in the url because we did not specify use DirectoryIndex directive to set
the index.html.
- Check the logs in /users/server/students/<yourloginname>/public_html/apache1.3/ws1/log/access_log
and see the access records is created.
- Email me the url of the access_log
file.
- Login to sanluis.
- cd public_html/apache1.3/ws2
- Repeat the above steps for sanluis
web site.
- Edit the cmd file substitute the
"cs526/public_htlm" string there with "<your loginname>/public_html".
- Run the apache web server with
"./cmd
which is
"/users/server/students/cs526/apache_1.3.28/src/httpd -d /users/server/students/<your
loginname>/public_html/apache1.3/ws2 -X"
- cp -r ws1 ws3 to create ws3 directory.
- login to shavano. Edit the httpd.conf
file and web page files in ws3/conf/htdocs directory to reflect the machine
shavano which will serve the web page. Create a subdirectory personnel and
a personnel web page with "this is shavano personnel web page "
as content in the htdocs directory.
- Run the web server and leave some
access records.
- Use WebBench on Ardor.uccs.edu
to evaluate the performance of the Apache web server on a CS Unix Machine
and win2000 server on wait.uccs.edu.
- Setup an apache web server on a
Unix machine as Exercise1
- You need to copy the webbench
tar file 3wtree.tar.gz (7.29MB) from ~cs526/public_html/webbench directory
to the htdocs (document root) directory of your web server.
- tar xvzf 3wtree.tar.gz to restore
the directory wbtree there.
- Check if one of the data file
http://blanca.uccs.edu:8<3digits>/wbtree/11426_1.htm is there.
Assume blanca is where your web server runs.
- Note that for IIS on wait.uccs.edu.
I have set up the wbtree data files already.
- For window system, make sure
you download the 3wtree.exe winzip file 20.4MB). The Unix file format
.tar.gz and winzip file format are different. If you download the incorrect
file, you will get 404 error.
- The location for download the
web bench http://www.etestinglabs.com/benchmarks/webbench/webbench.asp?visitor=
- Setup WebBench Controller and
client. Using the static_mt test suite. With Ramp Up time=3 seconds, Ramp
Down time=3 seconds, and length=30 seconds. We would like to shorten the
testing period since we are time share both wait.uccs.edu web server and
webbench machine ardor.uccs.edu.
- See instruction on installing webbench
and configuration and running the test suite.
http://cs.uccs.edu/~cs526/webbench/webbench.htm
- You have the choice of running
the tests at home or use the ardor.uccs.edu.
- Ardor.uccs.edu has already installed
with webbench. You can access them in start | all programs | pc magazine
benchmarks. Login with cs526 as username.
- To set the shorter Ramp Up/Down
times and length, first follow the steps in http://cs.uccs.edu/~cs526/webbench/webbench.htm#runWebbench
- In Edit Mix Defintion step, enter
those new Ramp Up/Down times and length parameters as below
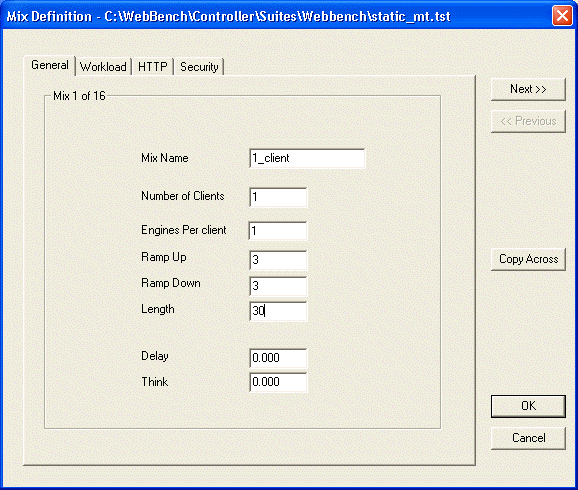
- Make sure you change the port and
server IP address in the mix definition workload dialog box. http://cs.uccs.edu/~cs526/webbench/webbench.htm#portIPaddr
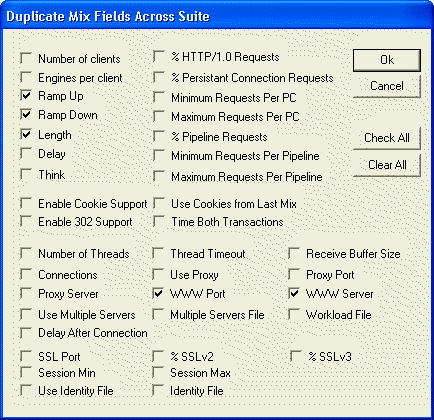
- Then click on "Copy Across"
button on the right. It will bring up the Duplicate. Select the Ramp Up/Down
times, length, www port, and www server options we just changed and click
OK so that the changes will apply to all test runs (1,4,8...,60 clients)
- After the test, to see the test
results, select results | view results ... and choose the test suits static_mt.tlg
which we use. A dialog box similar to below will appear.
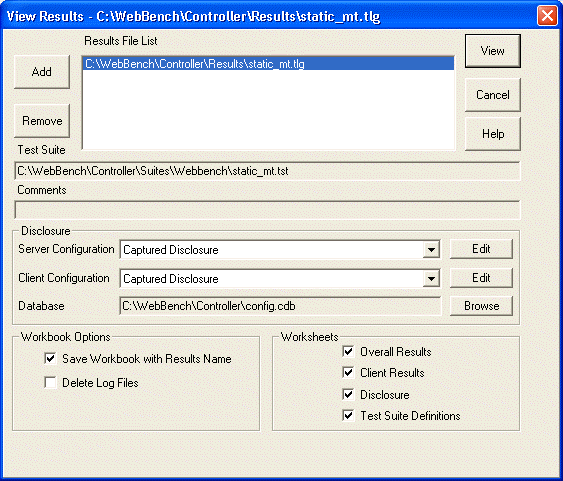
Make sure all worksheets options are selected and "Save Workbook with
Results Name" is selected.
You can edit the Client/Server configuration to reflect their OS version,
CPU, memory, and network configuration. Or just enter those info in the
comments.
Select View to bring up the Excell spreadsheet.
- You will see a table summarized
the mix names and the measured response time (requests/seconds) and throughtput
(bytes/sec) numbers. It also shows the plots of those two performance parameters
over different number of clients.
- Save the Excell spreadsheet results
for your exercise 4.
- Repeat the same thing for the IIS
server running on wait.uccs.edu.
- Compare the performance of the
two web servers.
Hint: You can combine the two related plots to highlight the comparison.
- In your hw1 of submission, include
spreadsheets (or a url link to them) and your assessment of the two web
severs.
Create a homework web page hw1.html
with the above answers (provides links to the log files in your homework web
sites and Excel spread sheet file). Check those links make sure they are ok.