- Learn basic Basic Firewall concepts, and how to set up and operate a Linux Firewall/Router using iptable.
- Learn to use Ethereal for monitoring the network traffic.
Assignment
Date: 4/2/2003
Due Day:
4/17/2003
Description:
Exercise a: Setup and Operate a Linux Firewall/Router
We will set up a Linux Firewall/Router
using iptables commands.
Here is
the reservation web page. Try to reserve only one hour per day.
The topology of the small network we setup for this exercise is shown below.
There are two testbeds: testbed1 and testbed2 Currently only Testbed 1 is
up. When Testbed 2 is back up, I will add additional reservation entries.
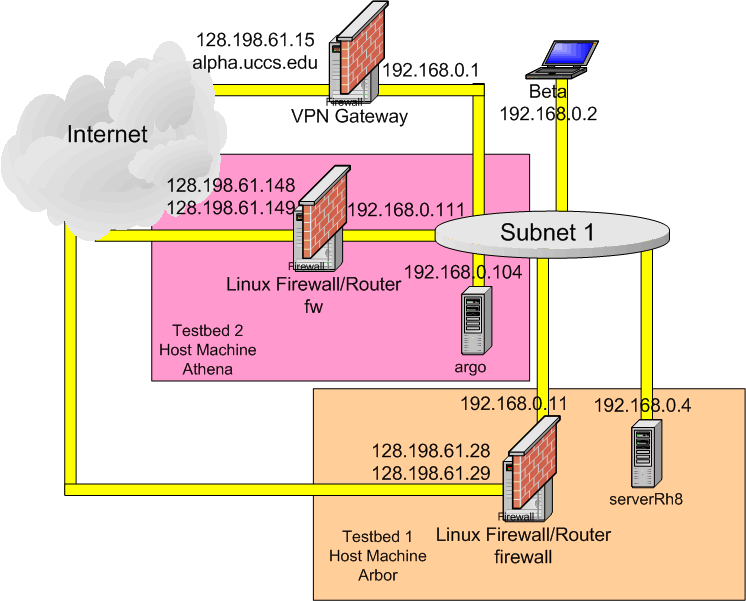
The two machines in each testbed are actually virtual machines serve by a host machine running vmware. The host of testbed 1 is arbor, the Dell Precison 350 workstation running Microsoft XP, which you used to instal Redhat 8. The host of testbed 2 is athena.uccs.edu, the Dell PowerEdge 2550 Server running Redhat8smp.
The virtual machines
are all running redhat8 with SSH turn on. You can access them using ssh -l
<login> <ipaddress>. For those behind the firewall, you can first
login to the firewall then login them using the private LAN address. You can
also access them through the VPN gateway alpha.uccs.edu. These virtual machines
have the same root password as our hw1.
The virtual machines was configured to have two virtual network adapters.
To add the additional network adapter, after we specify the basic virtual
machine with one bridged network adapter, select Setting | Configuration Editor
and click the add button and the network adapter iconClick next> button.
The Network Type dialog window will appear. Select the "custom: Specific
virtual network" and choose VMNet2 for this new bridged network interface.
For Linux host, you need to use vmware-config.pl command to add additional
network interface.
Then on VMWare window, select Setting | Manage virtual networks. Click on the Bridge Mapping tab. On VMNet2 section, select the 2nd physical network interface card. In testbed 1, we select the Intel Gigabit MT Card, which is used for the 192.168.0.0/24 subnet. The first physical network interface card was assigned with 128.198.60.19 as IP address and was automatically chosen to assocate with VMNet0 (default bridged). This completes the set up of two Virtual Networks, VMNet0 and VMNet2.
Note that the IP address assignments are different in each subnet. If you reserve Testbed2 for your exercise, make sure you adjust your IP address assignments. The description below is based on the IP address assignment for Testbed 1. Try to use the shell script in /root/firewall for the exercise. Setting the IP address incorrectly will result the machine not accessible remotely. You then need to reset it on the console.
Note that on the firewall of Testbed 1, the two public IP addresses are associated with eth0 and eth0:1. Its private IP address is associated with eth1. On the firewall of Testbed 2, the two public IP addresses are associated with eth2 and eth2:1. Its private IP address is associated with eth0. Make sure you adjust the interface number in the iptables accordingly.
Subnet 1, 192.168.0.0/24, is considered as inside of the firewall. The following is the script in /root/firewall/firewallSetup.sh:
#!/bin/sh
ifconfig eth0 128.198.61.28
ifconfig eth0:1 128.198.61.29
ifconfig eth1 192.168.0.11
route add default gw 128.198.61.1
echo "1" > /proc/sys/net/ipv4/ip_forward
iptables -t nat -A POSTROUTING -o eth0 -j MASQUERADE
iptables -L
Note that the 128.198.61.29 is established as IP aliase for eth0 using ifconfig eth0:1 command. You can use ifconfig eth0:2 to assigned another IP address to this firewal protected LAN. 192.168.0.11 is assigned to eth1, which is the defaults gateway for the intranet. The "route add default gw 128.198.61.1" command tells the firewall the default gateway to route the packets destined for extranet.
The 'echo "1" > /proc/sys/net/ipv4/ip_forward' command enable
the IP forwarding between eth0 and eth1. Without it, the packets will not
be carried over between subnet 1and extranet. The above echo command set a
flag value, "1", in a memory resident kernel file system called
proc. The kernel networking code wil test this flag and decide whether to
perform the IP forwarding. You can use "cat /proc/sys/net/ipv4/ip_forward"
to see the current value. You can browse /proc/net and other /proc directory
to see other parameters in the kernel.
Next are three iptables commands.
-F option
is used for flushing out the existing fiewall rules.
-L option is used for displaying the current set of firewall rules.
-t nat -A POSTROUTING: -t nat specifies that we are operating a nat (Network
Address Translating) table; -A POSTROUTING specifes this is post routing (on
the way out to network interface. This combination is referred to the Source
Network Address Translation to be done.
-o eth0 specifies the outgoing interface which the packets destined
-j (Jump/Targe) specifes the target, i.e., what to do when the packet matches
the specificaton. Here we have -j MASQUERADE
specifies we should perform IP-masquerade, which translates the intranet IP
address and port number into that of the outoging IP address and available
ports. You can also specifies -j SNAT which translates
only the IP addresses, the port number is preserved unchanged. It requires
that you have the equal number of outgoing IP addresses as IP address in your
intranet that are carrying in the source address field of the outgoing packets.
Since it does not have to search for the available port
or available IP address, SNAT is faster than
MASQUERADE.
The nat
table is consulted when a packet that creates a new connection is encountered.
It consists of three built-ins: PREROUTING
(for altering packets as soon as they come in), OUTPUT
(for altering locallyâgenerated packets before routing), and POSTROUTING
(for altering packets as they are about to go out).
Action0:
Login
to the blanca.uccs.edu (128.198.162.60), firewall (128.198.61.28), and ServerRh8
(192.168.0.4). For ServerRh8, you can first access alpha then login to ServerRh8
using ssh. Note that you only has cs691 account access on alpha, same password
as used in hw1. For the firewall and ServerRh8 use the root account to login.
On ServerRh8, type "cd /root/firewall" then "./serverRh8Setup.sh"
to setup the ip address and default gateway.
On Firewall machine, type "cd /root/firewall" then "./cleanup.sh".
The cleanup.sh contains
#!/bin/sh
ifconfig eth0 128.198.61.28
ifconfig eth0:1 128.198.61.29
ifconfig eth1 192.168.0.11
route deldefault gw 128.198.61.1
echo 0 > /proc/sys/net/ipv4/ip_forward
iptables -F
iptables -t nat -F
The ifconfig command setup
the IP addresses.
The route command deletes the default gateway entry in the routing table.
The echo 0 command set the ip_forwarding flag to 0 (no forwarding).
The iptables -F and iptables -t nat -F commands flush out all exisiting firewall
rules. Leave it empty with default policy.
Question
0.1: On machine blanca, type "ping 128.198.61.28" Did you get ICMP
reply? Why?
Question 0.2. On machine blanca, type "ping 192.168.0.11" Did yo get ICMP reply? Why?
Question 0.3 On machine serverRh8, type "ping 192.168.0.11" Did you get ICMP reply? Why?
Question 0.4 On machine serverRh8, type "ping 128.198.61.28" Did you get ICMP reply? Why?
Question 0.5 On machine serverRh8, type "ping 128.198.162.60" Did you get ICMP reply? Why?
Action 1. In the /root/firewall
directory of the Firewall machine, type "./firewallSetup.sh" to
setup the firewall. You should see the following prompt:
Question
1.1: On machine blanca, type "ping 128.198.61.28" Did you get ICMP
reply? Why?
Question 1.2. On machine blanca, type "ping 192.168.0.11" Did yo get ICMP reply? Why?
Question 1.3 On machine serverRh8, type "ping 192.168.0.11" Did you get ICMP reply? Why?
Question 1.4 On machine serverRh8, type "ping 128.198.61.28" Did you get ICMP reply? Why?
Question 1.5 On machine serverRh8, type "ping 128.198.162.60" Did you get ICMP reply? Why?
Question 1.6 On machine blanca, type "lynx 128.198.61.29". Did you get the web page back? Why?
(lynx is a text based
web browser. It does not have cache and always retrieve the new web page.)
Action2:
First on serverRh8, run "ping 128.198.162.60". Let it runs continuously.
Then on Firewall machine, type
"echo "0" > /proc/sys/net/ipv4/ip_forward".
Q2. What happens on the ping command? Why?
Action 3:
On Firewall machine type "echo "1" > /proc/sys/net/ipv4/ip_forward" command on the firewall machine. We will see ICMP reply continues.
On serverRh8, type "ssh -l <login> blanca.uccs.edu". Here <login> is your login name on CS Unix machines.
Q3. Will
that works?
Note that if "route add default gw 128.198.61.1" is not added in
the firewallSetup.sh script, then from firewall, you can only ping those in
128.198.61.0/26 subnet but not externet such as 128.198.1.250. The firewall
did not know where to forward the packet to 128.198.1.0/24 subnet.
[root@rh8 firewall]# ping 192.168.0.102
PING 192.168.0.102 (192.168.0.102) from 192.168.10.2 : 56(84) bytes of data.
64 bytes from 192.168.0.102: icmp_seq=1 ttl=254 time=25.8 ms
64 bytes from 192.168.0.102: icmp_seq=2 ttl=254 time=3.30 ms
64 bytes from 192.168.0.102: icmp_seq=3 ttl=254 time=2.43 ms
--- 192.168.0.102 ping statistics ---
3 packets transmitted, 3 received, 0% loss, time 2004ms
rtt min/avg/max/mdev = 2.431/10.529/25.853/10.841 ms
[root@rh8 firewall]# ping 128.198.1.250
PING 128.198.1.250 (128.198.1.250) from 192.168.10.2 : 56(84) bytes of data.
From 192.168.10.1 icmp_seq=1 Destination Net Unreachable
From 192.168.10.1 icmp_seq=2 Destination Net Unreachable
From 192.168.10.1 icmp_seq=3 Destination Net Unreachable
--- 128.198.1.250 ping statistics ---
3 packets transmitted, 0 received, +3 errors, 100% loss, time 2006ms
Action 4:
Setup Destination NAT (DNAT) for accessing web server inside the firewall.
On Firewall machine, run accessWS.sh by typing "./accessWS.sh"
#!/bin/sh
iptables -t nat -A PREROUTING -p TCP -i eth0 -d 128.198.61.29 --dport 80 -j
DNAT --to-destination 192.168.0.4
This rule indicates that if a packet first come from eth0 (from outside, internet) with 128.198.61.29 as destination address, carry TCP segment with destination port 80, it should be routed to 192.168.0.4 using DNAT target. This applies to the nat table with built-in PREROUTING chain.
Now see if we can access the apache web server on 192.168.0.4 using 128.198.61.29 as IP address from blanca using "lynx 128.198.61.29" or from any PC in ENS 149 using the IE.
Action 5: Prohibit Bad Buy from Coming in.
We can block the traffic from a specific IP address with the script similar
to rejestHost.sh:
#!/bin/sh
iptables -A FORWARD -p ALL -s 128.198.162.60
-j LOG --log-prefix "bad guy:"
iptables -A FORWARD -p ALL -s 128.198.162.60 -j DROP
Here for any packet with the source IP address as 128.198.162.60 will be logged in /var/log/messages with prefix "bad guy" and dropped.
The bad guy message can
be shown with "dmesg" as follows:
bad guy:IN=eth0 OUT=eth1 SRC=128.198.162.60
DST=192.168.0.4 LEN=60 TOS=0x00 PREC=0x00 TTL=62 ID=56720 DF PROTO=TCP SPT=34272
DPT=80 WINDOW=5840 RES=0x00 SYN URGP=0
bad guy:IN=eth0 OUT=eth1 SRC=128.198.162.60 DST=192.168.0.4 LEN=60 TOS=0x00
PREC=0x00 TTL=62 ID=20721 DF PROTO=TCP SPT=34273 DPT=80 WINDOW=5840 RES=0x00
SYN URGP=0
bad guy:IN=eth0 OUT=eth1 SRC=128.198.162.60 DST=192.168.0.4 LEN=60 TOS=0x00
PREC=0x00 TTL=62 ID=20722 DF PROTO=TCP SPT=34273 DPT=80 WINDOW=5840 RES=0x00
SYN URGP=0
It also shows in /var/log/messages as
Mar 20 22:50:59 firewall kernel: bad guy:IN=eth0
OUT=eth1 SRC=128.198.162.60 DST=192.168.0.4 LEN=60 TOS=0x00 PREC=0x00 TTL=62
ID=20723 DF PROTO=TCP SPT=34273 DPT=80 WINDOW=5840 RES=0x00 SYN URGP=0
Mar 20 22:51:11 firewall kernel: bad guy:IN=eth0 OUT=eth1 SRC=128.198.162.60
DST=192.168.0.4 LEN=60 TOS=0x00 PREC=0x00 TTL=62 ID=20724 DF PROTO=TCP SPT=34273
DPT=80 WINDOW=5840 RES=0x00 SYN URGP=0
Mar 20 22:51:34 firewall kernel: bad guy:IN=eth0 OUT=eth1 SRC=128.198.162.60
DST=192.168.0.4 LEN=60 TOS=0x00 PREC=0x00 TTL=62 ID=20725 DF PROTO=TCP SPT=34273
DPT=80 WINDOW=5840 RES=0x00 SYN URGP=0
Note that normally we
will use default policy of REJECT for all FORWRAD, INPUT, and OUTPUT chains.
The add permission to those allowed to come in or go out.
See the firewall examples in http://iptables-tutorial.frozentux.net/iptables-tutorial.html#INCLUDE.RCFIREWALL
and in http://iptables-tutorial.frozentux.net/iptables-tutorial.html#INCLUDE.RCDMZFIREWALL