Use State Exploration
Tool to Verify the Protocol
- You can use setool to
verify if your reachability analysis on the communication protocol based on
CFSM model is correct.
- login to any CS Unix
machines (sanluis, blanca, shavano, wetterhorn, redcloud, crestone) except
cs.uccs.edu, in front of the console.
- You can also use putty
secure shell and turn on the tunnel feature and run Hummingbird X server on
your PC.
- You may run xterm remotely
from home through UCCS dialup line but it will be very slow.
- mkdir cs522 in your
public_html directgory
- cd cs522
- Copy the ex2f2002.*
files from ~cs522/bin to your own directory. "cp ~cs522/bin/ex2f2002.*
~<login>/public_html/cs522" Here assume you have created a cs522
subdirectory.
- ~cs522/bin/setool
- This will bring up the
setool GUI interface.
- Right click on "Machine"
menu and select the "load machine" menuitem. It will bring the popup
command frame as below.

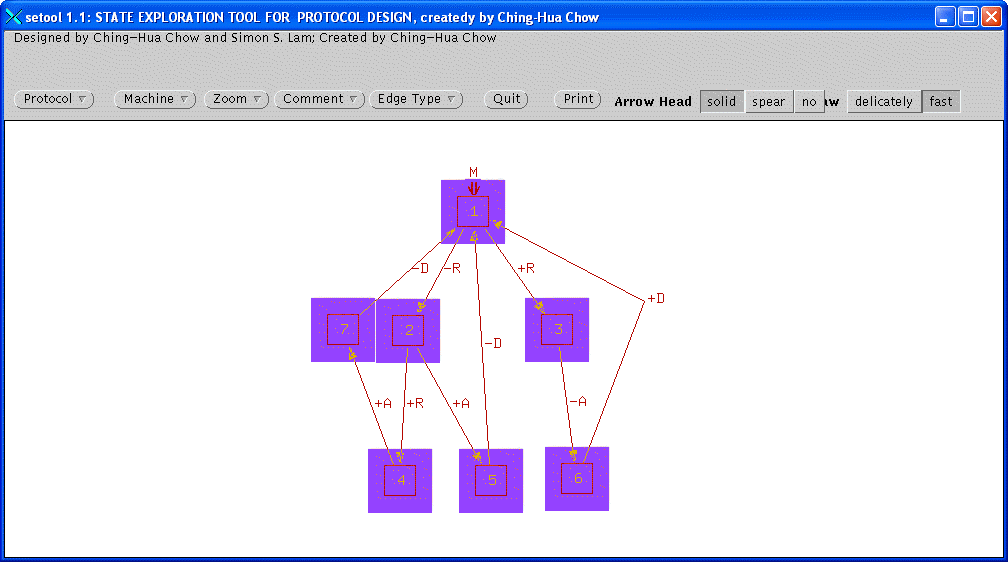
- Enter the ex2f2002 as
protocol name and M as machine name. Click "DO IT!" button.
- It will show the machine
as above.
- You can edit this machine
according to hw3ex1. This ex2 machine is very similar to hw3ex1 Machine M.
The only change is that (2,5, +A) should be repalced (removed) with (3, 5,
+B).
- To remove (2,5,+A),
right click the "Machine" menu, select the "remove edge".
The cursor will change to a circle.
- left click on the arc
of (2,5,+A) will remove the edge.
- To add (3,5,+B), right
click the "Machine" menu, select the "place edge" menuitem.
- Left click on the source
node 3, click middle button when cursor is on node 5 to conclude edge arc
specification.
- The cursor will be changed
to C shape and waiting for you to enter the edge lable.
- Type +B and hit enter
to conclude the edge specification.
- You can select "change
edge label" menuitem in "machine" menu, then left click on
the edge lable to change the edge lable of the machine.
- After editing the machine,
you can save it in a file. Right click on "Machine" menu and select
the "save machine" menuitem.

- Enter the protocol name
hw3f2002 and M as machine name. Click DO IT! button.
- Edit machine N of hw3f2002
by loading the machine N of ex2f2002. Follow the similar steps described above.
- After editing and saving
machine N of hw3f2002. Right click on "Protocol" menu, select the
"create protocol" menuitem.

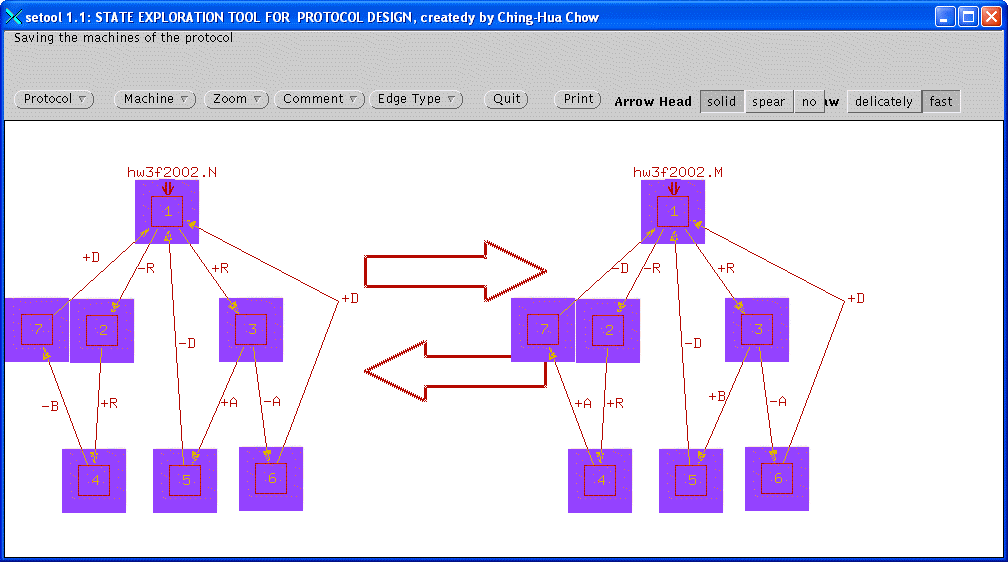
- Enter "hw3f2002"
as protocol name, "hw3f2002.M" as machine1's full name. note that
there is a "." between protocol name and machine name as full name.
Enter "hw3f2002.N" as machine 2's full name. Click "DO IT!"
button. It will show both machines side by side.
- To perform reachability
analysis, Right click "Protocol" menu, select "RG from initial
state". The following popup cmd frame shows up.

- Enter the depath you
would like to explore. Click "DO IT!" The reachability graph will
be generated similar the one below for ex2f2002.
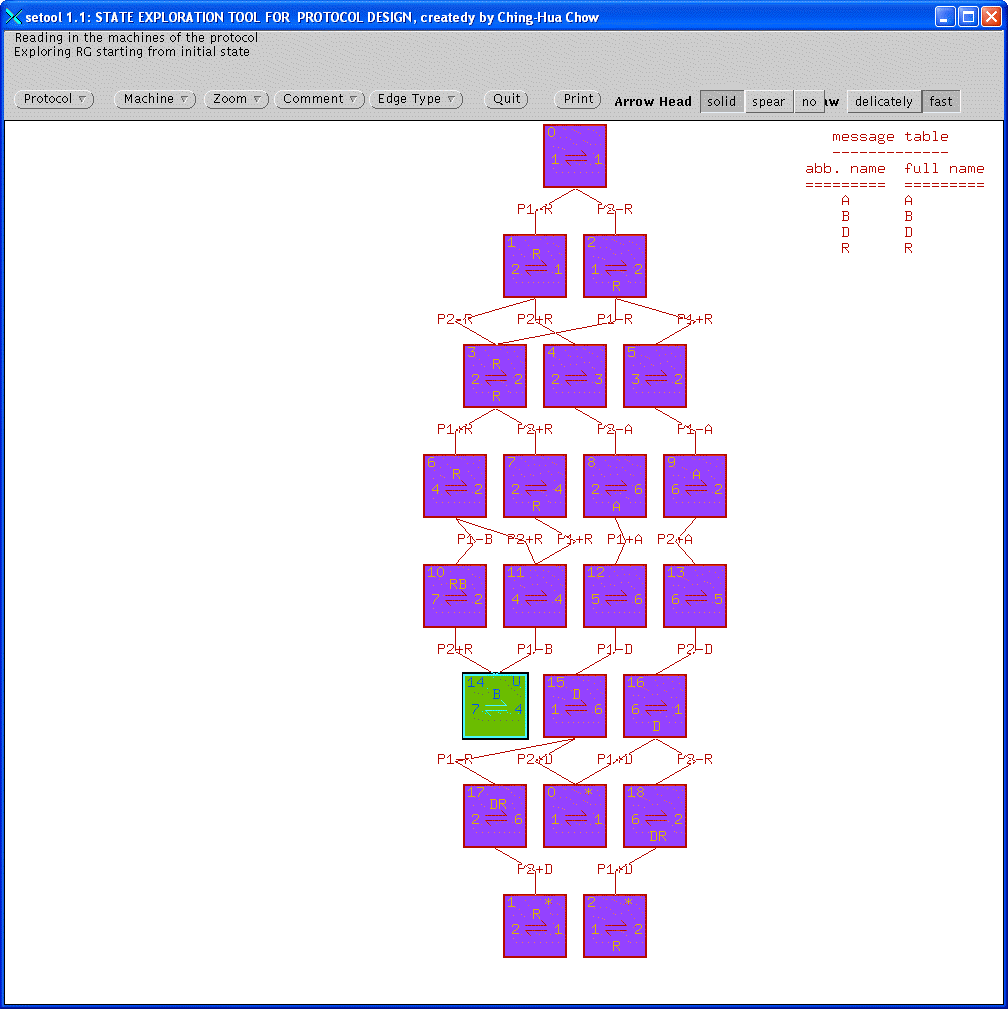
- Note that the reachability
graph indicates there is an Unspecified Reception Global state (gs14) marked
green. The P1 label corresponding to machine M (Machine 1) and P2 for machine
N. gs10 indicates we need to reserved buffer size of 2 for C1 channel. gs18
indicates that we need to reserve buffer size of 2 for C2 channel. The global
state with * on the upper right corner is a global state that appear before.
The deadlock state will be marked "D" on the upper right corner.
- setool is a prototype
and make sure you save your machine from time to time, since it may crash.
- You can save the machines,
the protocol, and reachability graphs to a file. You can also use the print
button to generate the screendump and save it as a Portable Network Graph
file, xse.png in your directory. You can then include that in your hw3.html
file. When you click on the print button, the cursor will change from arrow
to crossbar. Move the cursor to the setool window title bar and hit left button
to generate the png file.
- Email me if you have
question.